Easy Ionic Push Notifications With Ionic.io In 15 Minutes Last update: 2015-06-09
Everyone uses push notifications. Not you?
Well, you are lucky as Ionic helps us to include push notifications in our hybrid apps in absolutely no time. Follow my tutorial to include Ionic push notifications as fast and easy as possible! You will be surprised how fast it is.
Some time ago I had a guest post from Nic about Using Local Notifications In Your Ionic Framework App, and those are great. but those are only local notifications, so this time we will look at how real push notifications can be implemented very easy. We will create a simple starter project and the Ionic.io service for Ionic push notifications.
Check out the new and updated way of Ionic Push Notifications
Setting up a blank push project
As always, let’s start with a clean blank Ionic project, so go to your command line and run:
ionic start devdactic-push blank
cd devdactic-push
ionic upload
Did you notice the ionic upload?
This is our first interaction with the Ionic.io service. If you have no account yet, you can create one for free, you will need this to continue.
This service allows you to upload your apps, distribute them, view them with the Ionic View App and last but not least, integrate Ionic push notifications.
If you have the account, the upload command will ask for your credentials and upload the app.
Next we need some more Cordova plugins and other services from Ionic, so inside your project directory run these commands:
ionic plugin add https://github.com/phonegap-build/PushPlugin.git
ionic add ngCordova
ionic add ionic-service-core
ionic add ionic-service-push
ionic add angular-websocket
If everything is installed, open your index.html and load all the just installed fails below your ionic.bundle.js:
<script src="lib/angular-websocket/angular-websocket.js"></script>
<script src="lib/ngCordova/dist/ng-cordova.js"></script>
<script src="lib/ionic-service-core/ionic-core.js"></script>
<script src="lib/ionic-service-push/ionic-push.js"></script>
The last change for those services is now to include them inside our angular module, so open the app.js and change your module dependency array to this:
angular.module('starter', [
  'ionic',
  'ngCordova',
  'ionic.service.core',
  'ionic.service.push'
])
Are you ready for some Ionic push notfication action?
Basic App Identification Settings
The first thing we need to add Ionic push notifications is to identify our app on startup with the Ionic.io service. Open your app.js and add this part after the angular module declaration:
.config(['$ionicAppProvider', function($ionicAppProvider) {
  $ionicAppProvider.identify({
    app_id: 'INSERT_APP_ID',
    api_key: 'INSERT_PUBLIC_KEY',
    dev_push: true
  });
}]);
Where do I get those keys from?
That would be the correct question right now. As you have uploaded your app in the first step of creating this project, you can find all the information you need in your Ionic.io Apps Dashboard. Your dashboard should look something like this (maybe you have more apps, but the one should be there): 
Now first of all you need the app-id which is the one right on your app card. Copy and paste that one to your app.js where currently the placeholder INSERT_APP_ID is.
Additional we need the Ionic push notifications API key, so in your dashboard select the app, in the new appearing menu go to Settings -> Keys and copy your Public Key. Insert this key to the INSERT_PUBLIC_KEY placeholder. Good job!
You might have also noticed the dev_push: true key. This one sets our app to development mode, because we will start with a simple test notification. Setting up production notifications for iOS and Android is a bit harder because it includes some more steps.
If you want a tutorial about iOS and Android production notifications, just let me know!
Ionic Push Notifications in Action
We can almost see the finish line…but before we need to take care of the real coding. Open your index.html and replace everything inside the body with this simple view:
<body ng-app="starter" ng-controller="PushCtrl">
	<ion-pane>
		<ion-content>
			<button class="button button-block button-dark" ng-click="identifyUser()">
				Identify a user
			</button>

			<button
				class="button button-block button-positive"
				ng-if="identified"
				ng-click="pushRegister()"
			>
				Register for Push
			</button>
		</ion-content>
	</ion-pane>
</body>
We need 2 buttons as we first of all need to identify the current user, and if this action is done we need to register for a push notification.
Let’s add a simple controller with all the dependencies we need to our app.js:
.controller('PushCtrl', function($scope, $rootScope, $ionicUser, $ionicPush) {});Quite some dependencies, but we will use all of them in the next steps. As I said before, we need to identify the user so inside our controller add this function which is assigned to our first button:
$scope.identifyUser = function() {
	var user = $ionicUser.get();
	if(!user.user_id) {
		// Set your user_id here, or generate a random one.
		user.user_id = $ionicUser.generateGUID();
	};

	// Metadata
	angular.extend(user, {
		name: 'Simon',
		bio: 'Author of Devdactic'
	});

	// Identify your user with the Ionic User Service
	$ionicUser.identify(user).then(function(){
		$scope.identified = true;
		console.log('Identified user ' + user.name + '\n ID ' + user.user_id);
	});
};
In general, we create a random user id, and call the $ionicUser service to identify the current user. The metadata is not mandatory here, but it’s always good to include it. Now we are able to register for push notifications!
Add the next function to our controller, which will register our device for push notifications:
// Registers a device for push notifications
$scope.pushRegister = function() {
 console.log('Ionic Push: Registering user');

 // Register with the Ionic Push service.  All parameters are optional.
 $ionicPush.register({
   canShowAlert: true, //Can pushes show an alert on your screen?
   canSetBadge: true, //Can pushes update app icon badges?
   canPlaySound: true, //Can notifications play a sound?
   canRunActionsOnWake: true, //Can run actions outside the app,
   onNotification: function(notification) {
     // Handle new push notifications here
     return true;
   }
 });
};
You can change some of the parameters, but as we are using development notifications which are a bit different to real native notifications, this makes no big difference. We are now ready to receive them, but to test them we need the device id, which we can get from the register callback, so also append this code to our controller:
$rootScope.$on('$cordovaPush:tokenReceived', function(event, data) {
  alert("Successfully registered token " + data.token);
  console.log('Ionic Push: Got token ', data.token, data.platform);
  $scope.token = data.token;
});
Now we will see the log of our device on the console. Try it!
Serve your app in the browser or on the device, and make sure to get the logs as you need this. Right now this is just the ability to receive notifications.
How do I send out notifications?
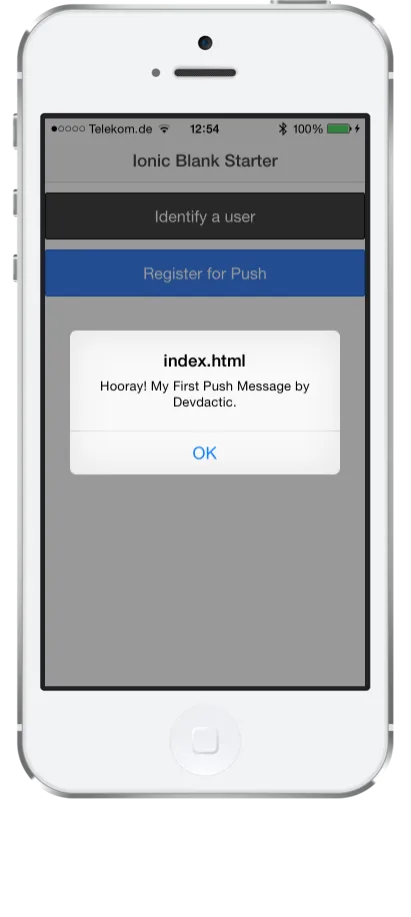
Ionic wouldn’t be Ionic if there was no simple solution. Go to your CLI and run ionic push -s
This will ask for some parameters, so paste what it needs. Make sure to take the Private API Key from your Ionic.io dashboard keys setting, I tried this with the public key for about 2 hours until I realised it. If you have inserted everything correct, you should see a notification, appearing like magic, which will look something similar to this:
Conclusion
Congratulations on setting up Ionic push notifications, the most easy way I can think of to add push notifications to your hybrid app. If you want to read a further tutorial about iOS and Android integration, just leave me a comment below!
See a video version of this article below, and make sure to follow my YouTube channel for more great video tutorials.
If all of this was helpful, I would be happy to see a follower more on @schlimmson and leave a comment/ tweet it! Make sure to subscribe to my mailing list to receive new posts and updates by mail!
So long, Simon