How to Secure your App with Ionic Identity Vault Last update: 2022-04-19
If you are serious about your Ionic app development and want the most secure functionality when working with user data and APIs, you should take a closer look at Ionic Identity Vault.
Ionic Identity Vault is basically an all-in-one solution for managing sensitive data on your device.
- Want to protect data when the app goes to background?
- Want to easily show native biometric authentication dialogs?
- Protect the privacy of your app when put to background?
- Automatically log access to private data after time in background?
All of these things can be accomplished with other solutions, but Ionic Identity Vault combines 12 APIs into one plugin, so you get the best possible security for your enterprise data.
I could test Ionic Identity Vault for free as an Ionic community expert, but otherwise it’s a paid plugin for which you need a dedicated subscription.
The idea is basically to let Ionic do the hard work while you can rest assured that your data is protected in the best possible way.
Let’s create a simple Ionic app and test drive some Ionic Identity Vault functionality!
Starting a new Ionic App
We can start as always with a blank Ionic app and add one additional page and service:
ionic start identityApp blank --type=angular
cd ./identityApp

ionic g page login
ionic generate service services/authVault
Before you add your native iOS and Android project you should also define your app ID inside the capacitor.config.json:
{
  "appId": "com.devdactic.identityapp",
  "appName": "Devdactic Identity",
  "webDir": "www",
  "bundledWebRuntime": false
}
Finally we can also change our routing so we start on the dummy login page first. For this, bring up the src/app/app-routing.module.ts and change it to:
import { NgModule } from '@angular/core';
import { PreloadAllModules, RouterModule, Routes } from '@angular/router';

const routes: Routes = [
  {
    path: '',
    loadChildren: () =>
      import('./login/login.module').then((m) => m.LoginPageModule),
  },
  {
    path: 'home',
    loadChildren: () =>
      import('./home/home.module').then((m) => m.HomePageModule),
  },
];

@NgModule({
  imports: [
    RouterModule.forRoot(routes, { preloadingStrategy: PreloadAllModules }),
  ],
  exports: [RouterModule],
})
export class AppRoutingModule {}
At this point you can also create the first build of your app and add the native platforms:
ionic build
ionic cap add android
ionic cap add ios
Now we can integrate Identity Vault into our app.
Ionic Identity Vault Integration
To install Identity Vault you need to use your enterprise key from your Ionic dashboard, which you need to assign to one of your apps first.
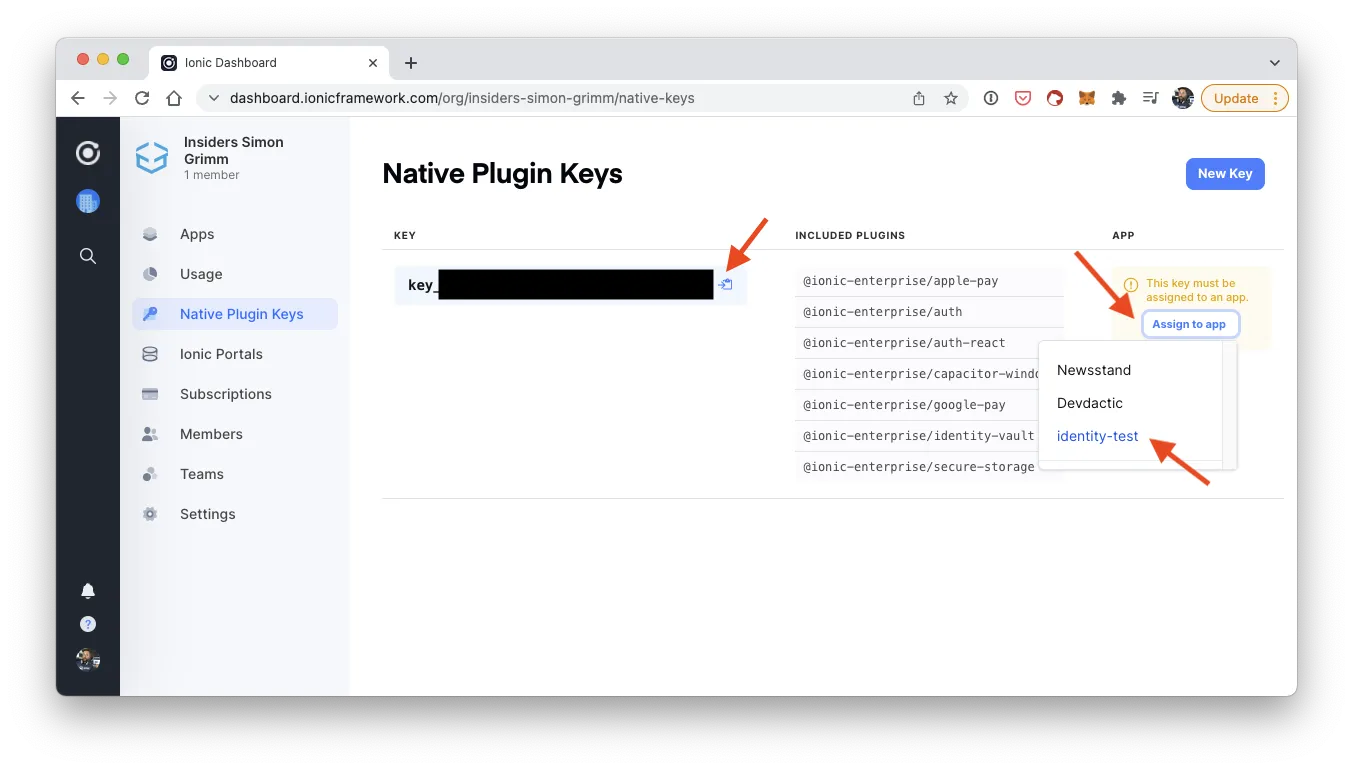
So before installing the actual Identity Vault package, run the register function and insert your Native Plugin Key if you never did this before:
# If you never did this
ionic enterprise register

npm install @ionic-enterprise/identity-vault
To use the biometric functionality we now also need to add the permission for iOS inside the ios/App/App/Info.plist:
<key>NSFaceIDUsageDescription</key>
<string>Use Face ID to authenticate yourself and login</string>
Now we are ready to use the package and integrate it in our app flow!
Creating a Vault Service
We begin by creating a service that interacts with the actual vault, so we have all data storing and locking mechanism in one central service and not scattered around our pages.
To get started we need a configuration to initialise our vault. In here we define how the vault behaves:
- The key identifies the vault, and you could have multiple vaults with different keys
- The type defines how your data is protected and stored on the device
- The deviceSecurityType defines which authentication is used to unlock the vault
Additionally there are some more settings which are pretty easy to understand, and you can find all possible values in the Identity Vault docs as well!
On top of that we keep track of the state or session with another variable, so we keep the data in memory as well. This is optional, but helps to make working with the stored data easier as you don’t need to make a call to retrieve a value from the vault all the time while the app is unlocked!
Since Identity Vault 5 there’s also a great fallback for the web which doesn’t exactly work like the native implementation, but it allows us to build the app more easily on the browser. For this, we create the right type of Vault in our constructor with a simple check.
Let’s begin our service now by changing the src/app/servies/auth-vault.service.ts to:
import { Injectable, NgZone } from '@angular/core';
import { Capacitor } from '@capacitor/core';
import {
  BrowserVault,
  Device,
  DeviceSecurityType,
  IdentityVaultConfig,
  Vault,
  VaultType,
} from '@ionic-enterprise/identity-vault';
import { NavController } from '@ionic/angular';

const DATA_KEY = 'mydata';
const TOKEN_KEY = 'mytoken';

@Injectable({
  providedIn: 'root',
})
export class AuthVaultService {
  vault: Vault | BrowserVault;

  config: IdentityVaultConfig = {
    key: 'com.devdactic.myvault',
    type: VaultType.DeviceSecurity,
    deviceSecurityType: DeviceSecurityType.Both,
    lockAfterBackgrounded: 100,
    shouldClearVaultAfterTooManyFailedAttempts: true,
    customPasscodeInvalidUnlockAttempts: 2,
    unlockVaultOnLoad: false,
  };

  state = {
    isLocked: false,
    privateData: '',
  };

  constructor(private ngZone: NgZone, private navCtrl: NavController) {
    this.vault =
      Capacitor.getPlatform() === 'web'
        ? new BrowserVault(this.config)
        : new Vault(this.config);
    this.init();
  }
}
After this setup we need to define some more things, especially how the vault behaves when we lock or unlock it later.
Those are the points where you clear the stored data in memory, or set the value by using the getValue() method of the vault to read stored data, just like you would do with Ionic Storage!
We also got access to a special Device object from the Identity Vault package through which we can trigger or define specific native functionalities. In our case, we define that whenever our app is put in the background, it will show the splash screen instead of a screenshot from the app.
This is another level of privacy so you can’t see the content of the app when going through the app windows on your device!
Continue with the service and add the following function now:
async init() {
  this.state.isLocked = await this.vault.isLocked();

  Device.setHideScreenOnBackground(true);

  // Runs when the vault is locked
  this.vault.onLock(() => {
    this.ngZone.run(() => {
      this.state.isLocked = true;
      this.state.privateData = undefined;
    });
  });

  // Runs when the vault is unlocked
  this.vault.onUnlock(() => {
    this.ngZone.run(async () => {
      this.state.isLocked = false;
      this.state.privateData = await this.vault.getValue(DATA_KEY);
    });
  });
}
Finally we need some more helper functionalities in order to test our vault from our pages.
We can directly call the lock() or unlock() methods, which in response will trigger the events we defined before to clear or read the data.
On a possible login we will also directly store a token - one of the most common operations you would use vault for as this makes sure any kind of token that was issued by your server is stored safely.
By using isEmpty() we can check if there are any values in the vault even without authentication, which will be used later to automatically log in users if there is any stored data (which might require a bit more logic to check the value in a real world scenario).
If we log out the user, we would also clear() all data from the vault and our state object so there is no piece of sensitive information left anywhere when the user really ends the session!
Now finish our service by adding these additional functions:
lockVault() {
  this.vault.lock();
}

unlockVault() {
  this.vault.unlock();
}

async login() {
  // Store your session token upon successful login
  return this.vault.setValue(TOKEN_KEY, 'JWT-value-1123');
}

async setPrivateData(data: string) {
  await this.vault.setValue(DATA_KEY, data);
  this.state.privateData = data;
}

async isEmpty() {
  return this.vault.isEmpty();
}

async logout() {
  // Remove all stored data
  this.state.privateData = undefined;
  await this.vault.clear();

  this.navCtrl.navigateRoot('/', { replaceUrl: true });
}
With all of this in place we can finally build our pages and run through the different functions.
Creating the Dummy Login
We are not using a real API in this example, but you could easily imagine another call to your server with your users credentials upon which your app receives some kind of token.
This token would be stored inside the vault, and if we enter the login page and notice that there is data inside the vault, we can directly try to unlock the vault which will trigger the defined biometric/passcode authentication and skip to the inside area of our app.
Again, this is a bit simplified as you might have other information inside the vault next to the actual token for your API, or you might have to get a new access token based on the refresh token in your app.
Bring up the src/app/login/login.page.ts and insert our dummy login functions:
import { Component, OnInit } from '@angular/core';
import { NavController } from '@ionic/angular';
import { AuthVaultService } from '../servies/auth-vault.service';

@Component({
  selector: 'app-login',
  templateUrl: './login.page.html',
  styleUrls: ['./login.page.scss'],
})
export class LoginPage implements OnInit {
  state = {
    email: '',
    password: '',
  };

  constructor(
    private authVaultService: AuthVaultService,
    private navCtrl: NavController
  ) {}

  async ngOnInit() {}

  async ionViewWillEnter() {
    // Check if we have data in our vault and skip the login
    const isEmpty = await this.authVaultService.isEmpty();

    if (!isEmpty) {
      await this.authVaultService.unlockVault();
      this.navCtrl.navigateForward('/home', { replaceUrl: true });
    }
  }

  async login() {
    await this.authVaultService.login();
    this.navCtrl.navigateForward('/home', { replaceUrl: true });
  }
}
The template for this page will be very minimal so we can just trigger the login, the fields are actually not really necessary in our dummy. Anyway, open the src/app/login/login.page.html and change it to:
<ion-header>
  <ion-toolbar>
    <ion-title>Login</ion-title>
  </ion-toolbar>
</ion-header>

<ion-content>
  <ion-item>
    <ion-label position="floating">E-Mail</ion-label>
    <ion-input type="email" [(ngModel)]="state.email"></ion-input>
  </ion-item>
  <ion-item>
    <ion-label position="floating">Password</ion-label>
    <ion-input type="password" [(ngModel)]="state.password"></ion-input>
  </ion-item>
  <ion-button (click)="login()" expand="full">Login</ion-button>
</ion-content>
Now we can already move to the inside area, and here we want to interact a bit more with our vault.
Working with identity Vault
At this point we want to show the secret data that a user might have inside the store, so we create a connection to the state object of our service and display the values which it contains in our template next.
Besides that we just need functions to call the according methods of our service, so let’s prepare the src/app/home/home.page.ts like this:
import { Component } from '@angular/core';
import { AuthVaultService } from '../servies/auth-vault.service';

@Component({
  selector: 'app-home',
  templateUrl: 'home.page.html',
  styleUrls: ['home.page.scss'],
})
export class HomePage {
  myInput = '';
  state = undefined;

  constructor(private authVaultService: AuthVaultService) {
    this.state = this.authVaultService.state;
  }

  async logout() {
    await this.authVaultService.logout();
  }

  savePrivateData() {
    this.authVaultService.setPrivateData(this.myInput);
  }

  lockVault() {
    this.authVaultService.lockVault();
  }

  unlockVault() {
    this.authVaultService.unlockVault();
  }
}
Now we need to react to the isLocked state of our service, which is updated whenever the vault is locked or unlocked.
Therefore we display either a lock or an unlock button first of all, which will help us to unlock the vault if it’s currently locked.
We could also define an automatic unlock behaviour by setting the unlockVaultOnLoad flag inside the vault config to true instead!
Below that we display a little input field so we can type some data and then store it away in our vault, plus a card that shows the current value of that field from the state object.
Wrap up our app by changing the src/app/home/home.page.html to this:
<ion-header>
  <ion-toolbar>
    <ion-title> Home </ion-title>
    <ion-buttons slot="end">
      <ion-button (click)="logout()">
        <ion-icon slot="icon-only" name="log-out"></ion-icon>
      </ion-button>
    </ion-buttons>
  </ion-toolbar>
</ion-header>

<ion-content>
  <ion-button
    expand="full"
    (click)="unlockVault()"
    *ngIf="state.isLocked"
    color="success"
  >
    <ion-icon name="lock-open-outline" slot="start"></ion-icon>
    Unlock vault</ion-button
  >
  <ion-button
    expand="full"
    (click)="lockVault()"
    *ngIf="!state.isLocked"
    color="warning"
  >
    <ion-icon name="lock-closed-outline" slot="start"></ion-icon>
    Lock vault</ion-button
  >

  <div *ngIf="!state.isLocked">
    <ion-item>
      <ion-label position="floating">Private</ion-label>
      <ion-textarea [(ngModel)]="myInput"></ion-textarea>
    </ion-item>
    <ion-button expand="full" (click)="savePrivateData()">Save data</ion-button>

    <ion-card>
      <ion-card-content> {{ state.privateData }}</ion-card-content>
    </ion-card>
  </div>
</ion-content>
Now we got our simply vault in place and we can play around with it to see how the page and app reacts to locking the vault, putting the app in the background for some time or even killing the app!
Teardown
Ionic Identity Vault is a great solution that combines a ton of different APIs and plugins to make storing secure and sensitive data inside your Ionic application a breeze.
However, it comes with a decent price so it might only appeal to enterprise customers at this point, but if you care about the privacy of your users and API, investing this money should be a no brainer.
In the end, Identity Vault will make your life a lot easier, protect your data in the best possible way and do all of that with a simple API so you don’t need to piece together different plugins and somehow build your own solution.
You can also see a detailed explanation of this tutorial in the video below!