Building a Calendar for Ionic With Angular Calendar & Calendar Alternatives Last update: 2018-03-13
Recently I was in need of a Calendar Component for one of my Ionic apps. Although there are some premade options available, none of them really solved all my needs out of the box. So I tried Angular Calendar..
After doing some researching and finally picking a package, I combined all my learning into this article to give you a little overview about different options for adding a Calendar to your Ionic app and also an approach to one of them!
Angular Calendar Comparison
We don’t have to reinvent the wheel all the time (although we could), there are great packages and modules already out there waiting to be used! Let’s take a look at a few of them I found the most popular among the different options:
Ionic2-Calendar
We’ve seen this calendar in action with Ionic before in this post, and it’s working great with Ionic (as it’s the only one directly made for Ionic). The different views for day/week/month look plain and good, the calendar itself allows some customisation settings as well.
Besides the good, the not so good is that some functionalities are not yet there like dragging or resizing events you might be used to from Google Calendar. Also, it’s pretty hard to do things like marking the active day and in the end you find yourself writing a lot more CSS then you initially thought.
Angular FullCalendar
This Calendar for Angular is using the quite popular FullCalendar, a jQuery component. This Calendar looks super functional from the outside but I’m not a big fan of bringing in any Plugin that has a dependency to jQuery as we generally don’t want that lib in our project as well.
Perhaps I’ll give this a try one day, if you already have definitely let me know because from the UI and funtionality this one looks like it has everything a good calendar needs.
PrimeNg Schedule
Just recently I learned about the Prime Faces package through one of the Ionic Academy members. It’s basically a package with nice UI elements for Angular. And they also got this Schedule component which get’s close to a Calendar component.
As we already have one great library with UI Elements (hello Ionic) I’m here as well not the biggest fan of using another library and increasing our apps size. Besides that objection, the functionality looks just as good as the Full Calendar one before.
Angular Calendar
In terms of environment this one comes the closest to the Ionic Calendar as it’s made for Angular - and what’s made for Angular is also good for Ionic, right? Also, the documentation and examples provided for this package are epic.
This calendar allows a lot of customisation with different options out of the box. The only downside here is the UI which is not really made for mobile as it’s also stated on the package site. However, with some minor customisations we can make this Ionic-ready and this is the one we will inspect throughout the rest of this article!
DIY
Although I advised not to reinvent the wheel sometimes all the options simply don’t work for your project. I wanted to link to 2 more good articles on how to get started, one directly for Ionic and one showing the basics with Angular:
If you want to build your own component, I think those 2 are great starting points!
Anyway, all of the maintainers deserve respect for their hard work.
I’ve simple picked the one I felt most comfortable with using for now, but eventually I’ll give the other options a chance as well. If you would like to see anyone of them in action, just let me know and I’ll happily craft a tutorial with them!
Setting up the Calendar App
Enough of the talk - it’s time for some code! As said before, we will make use of the Angular Calendar now and implement everything we need with Ionic.
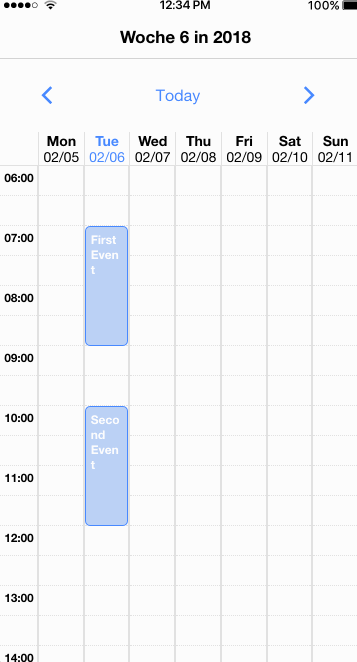
We also want to achieve a special weekly view (which is actually the standard in all apps) and the result will look like the image below.
Normally, the Calendar doesn’t support this type of view, but there’s another package that’s basically adding a day view into each day of the weeks view.
To finally get started, create a new Ionic app and install both the basic package as well as the one for our special week view and finally the Angular animations package:
ionic start devdacticCalendar blank
cd devdacticCalendar
npm i angular-calendar angular-calendar-week-hours-view @angular/animations
ionic g provider customEventTitleFormatter
ionic g provider customDateFormatter
We’ve also already created 2 providers which we will use later to format some labels.
Now we need to import all the previous stuff inside our Module. Besides that, I added 3 lines which help to localise our view later on. In this case we are loading the German locale (which is “de”), of course you could change this to whatever Language you need!
If you just want to use English, simply leave this out. Now go ahead and change your app/app.module to:
import { BrowserModule } from '@angular/platform-browser';
import { ErrorHandler, NgModule } from '@angular/core';
import { IonicApp, IonicErrorHandler, IonicModule } from 'ionic-angular';
import { SplashScreen } from '@ionic-native/splash-screen';
import { StatusBar } from '@ionic-native/status-bar';

import { MyApp } from './app.component';
import { HomePage } from '../pages/home/home';

import { BrowserAnimationsModule } from '@angular/platform-browser/animations';

import { CalendarModule, CalendarDateFormatter, CalendarEventTitleFormatter } from 'angular-calendar';

import { CalendarWeekHoursViewModule } from 'angular-calendar-week-hours-view';

import { CustomEventTitleFormatterProvider } from '../providers/custom-event-title-formatter/custom-event-title-formatter';
import { CustomDateFormatterProvider } from '../providers/custom-date-formatter/custom-date-formatter';

import localeDe from '@angular/common/locales/de';
import { registerLocaleData } from '@angular/common';
registerLocaleData(localeDe);

@NgModule({
  declarations: [
    MyApp,
    HomePage
  ],
  imports: [
    BrowserModule,
    IonicModule.forRoot(MyApp),
    BrowserAnimationsModule,
    CalendarModule.forRoot(),
    CalendarWeekHoursViewModule
  ],
  bootstrap: [IonicApp],
  entryComponents: [
    MyApp,
    HomePage
  ],
  providers: [
    StatusBar,
    SplashScreen
  ]
})
export class AppModule {}
We will later come back to the Module when we make use of our formatters, for now we can leave it like this.
Copying NPM Module Styles
Both the calendar and the week view have a custom CSS inside their Node Module package which we need to import. It doesn’t work that easy out of the box, we need to create a custom configuration to copy those CSS files to our build folder like described here.
Therefore, start by adding this block to your package.json and make sure you get the commas right and don’t mess up the files structure:
"config": {
   "ionic_copy": "./config/copy.config.js"
}
We have told Ionic to use a custom copy config, so create a folder config at the root of your project and inside a file called copy.config.js with this content:
module.exports = {
    copyAssets: {
        src: ['{{SRC}}/assets/**/*'],
        dest: '{{WWW}}/assets'
    },
    copyIndexContent: {
        src: ['{{SRC}}/index.html', '{{SRC}}/manifest.json', '{{SRC}}/service-worker.js'],
        dest: '{{WWW}}'
    },
    copyFonts: {
        src: ['{{ROOT}}/node_modules/ionicons/dist/fonts/**/*', '{{ROOT}}/node_modules/ionic-angular/fonts/**/*'],
        dest: '{{WWW}}/assets/fonts'
    },
    copyPolyfills: {
        src: ['{{ROOT}}/node_modules/ionic-angular/polyfills/polyfills.js'],
        dest: '{{BUILD}}'
    },
    copySwToolbox: {
        src: ['{{ROOT}}/node_modules/sw-toolbox/sw-toolbox.js'],
        dest: '{{BUILD}}'
    },
    copyCalendarCss: {
        src: './node_modules/angular-calendar/css/angular-calendar.css',
        dest: '{{BUILD}}'
    },
    copyWeekHoursCss: {
        src: './node_modules/angular-calendar-week-hours-view/angular-calendar-week-hours-view.scss',
        dest: '{{BUILD}}'
    }
}
The first 5 entries are actually copied from the original Ionic config, and the last 2 are added to copy over our own CSS files automatically!
When the files will be copied now, we only need to link them inside the src/index.html with the correct URL so add these 2 entries somewhere inside the HEAD area:
<link rel="stylesheet" href="build/angular-calendar.css">
<link rel="stylesheet" href="build/angular-calendar-week-hours-view.scss">
It seems not so super easy but actually it’s a nice way and we don’t have to take care of making sure the files are there - they will be automatically copied to the right location!
Now e got everything setup to finally build our Calendar!
The Calendar View
There’s a lot of code involved in this article so let’s start with the view which is perhaps one of the easier files. First of all, we can make use of a calendarDate pipe which is used to print out the right title for our view based on the current active date. Later we will also change the apperance of this title using our own formatters.
Below the header we craft a bar of 3 buttons to navigate into the future or past and back to today. Nothing special in general - but we can actually use a directive on those buttons that will automatically take care of the operation of changing the current date variable viewDate! That means, we don’t need a dedicated function to change our date.
At the bottom we finally use the calendar module with a few of it’s options. We will create most of the values inside our class and also implement the event functions there. There are even more options you could set, so definitely check out the great documentation for more information.
For now go ahead and change your pages/home/home.html to:
<ion-header>
  <ion-navbar>
    <ion-title>
      {{ viewDate | calendarDate:(view + 'ViewTitle') }}
    </ion-title>
  </ion-navbar>
</ion-header>

<ion-content>

  <ion-row>
    <ion-col col-12 col-md-3>
      <ion-row>
        <ion-col col-3 no-padding>
          <button ion-button full clear icon-only mwlCalendarPreviousView [view]="view" [(viewDate)]="viewDate">
            <ion-icon name="ios-arrow-back"></ion-icon>
          </button>
        </ion-col>
        <ion-col col-6 no-padding>
          <button ion-button full clear mwlCalendarToday [(viewDate)]="viewDate">Today</button>
        </ion-col>
        <ion-col col-3 no-padding>
          <button ion-button full clear icon-only mwlCalendarNextView [view]="view" [(viewDate)]="viewDate">
            <ion-icon name="ios-arrow-forward"></ion-icon>
          </button>
        </ion-col>
      </ion-row>
    </ion-col>
  </ion-row>

  <iq-calendar-week-hours-view
    [viewDate]="viewDate"
    [events]="events"
    [hourSegments]="2"
    [dayStartHour]="6"
    [dayEndHour]="20"
    (eventClicked)="handleEvent($event.event)"
    (hourSegmentClicked)="hourSegmentClicked($event)"
    (eventTimesChanged)="eventTimesChanged($event)"
    [weekStartsOn]="1"
    [refresh]="refresh"
    [locale]="locale">
  </iq-calendar-week-hours-view>

</ion-content>
We can also already bring in some CSS. As I said in the beginning, it’s not made for mobile so we have to apply some tweaks here and there and especially make the hour column smaller as it’s taking away too much space on a small device.
For now, change your pages/home/home.scss to:
page-home {

    .custom-event a {
        color: #fff !important;
        font-weight: bold;
        text-decoration: none;
    }

    .cal-day-view .cal-event {
        white-space: normal;
    }

    .cal-day-view .cal-event-container {
        width: 100% !important;
    }

    .cal-day-view .cal-time {
        width: 40px !important;
        font-size: smaller !important;
    }

    .cal-week-hours-view .cal-day-container:first-child {
        width: 40px !important;
        flex: none;
    }

    .cal-week-hours-view .cal-header:first-child {
        width: 40px !important;
        flex: none;
        border: none;
    }

    .cal-header {
        border-left: solid 1px #e1e1e1;
    }

    .cal-today {
        color: color($colors, primary) !important;
    }

}
Your Calendar is almost ready but we need some settings and events from our class before we can start it finally, so let’s do this now.
The Calendar Logic
A Calendar needs events, and with this package we can add quite a bunch of options already to our events. We can event set colours and decide whether an event can be resized or dragged!
Before we create the events, we also add a few variables which were used before by our view and the binding between the component and this class. I’m again setting my locale to ”de” here, simply switch this to en or whatever you like.
We also need a Subject here which is used later on to inform the Component that it should reload the data.
Below the constructor we then got 3 functions, all of them will be called based on actions of our Calendar:
- handleEvent: We’ve clicked on an event. Simply open an alert with some information for now
- eventTimesChanged: The event was dragged or resized and therefore the times need to be changed. When working with this, my function was called twice all the time and messed up the times, therefore I added the
isDraggingvariable which prevents the function from being called and executed immediately again (quick & dirty) - hourSegmentClicked: This functions is called whenever we clikc a free time slot. We simply generate a new dummy event at that time and add it to our array. Make sure to call
refresh.next()so your calendar is updated!
I’m not a big fan of splitting up listings as it’s easier for you to make errors or forget code, so here’s the full listing for your pages/home/home.ts:
import { Component } from '@angular/core';
import { NavController } from 'ionic-angular';
import { Subject } from 'rxjs/Subject';
import { AlertController } from 'ionic-angular/components/alert/alert-controller';
import {
  startOfDay,
  endOfDay,
  subDays,
  addDays,
  endOfMonth,
  isSameDay,
  isSameMonth,
  addHours
} from 'date-fns';
import {
  CalendarEvent,
  CalendarEventTimesChangedEvent
} from 'angular-calendar';

@Component({
  selector: 'page-home',
  templateUrl: 'home.html'
})
export class HomePage {

  viewDate: Date = new Date();
  view = 'week';
  locale: string = 'de';
  isDragging = false;
  refresh: Subject<any> = new Subject();

  events: CalendarEvent[] = [
    {
      start: addHours(startOfDay(new Date()), 7),
      end: addHours(startOfDay(new Date()), 9),
      title: 'First Event',
      cssClass: 'custom-event',
      color: {
        primary: '#488aff',
        secondary: '#bbd0f5'
      },
      resizable: {
        beforeStart: true,
        afterEnd: true
      },
      draggable: true
    },
    {
      start: addHours(startOfDay(new Date()), 10),
      end: addHours(startOfDay(new Date()), 12),
      title: 'Second Event',
      cssClass: 'custom-event',
      color: {
        primary: '#488aff',
        secondary: '#bbd0f5'
      },
      resizable: {
        beforeStart: true,
        afterEnd: true
      },
      draggable: true
    }
  ];

  constructor(public navCtrl: NavController, private alertCtrl: AlertController) { }

  handleEvent(event: CalendarEvent): void {
    let alert = this.alertCtrl.create({
      title: event.title,
      message: event.start + ' to ' + event.end,
      buttons: ['OK']
    });
    alert.present();
  }

  eventTimesChanged({event, newStart, newEnd} : CalendarEventTimesChangedEvent): void {
    if (this.isDragging) {
      return;
    }
    this.isDragging = true;

    event.start = newStart;
    event.end = newEnd;
    this.refresh.next();

    setTimeout(() => {
      this.isDragging = false;
    },1000);
  }

  hourSegmentClicked(event): void {
    let newEvent: CalendarEvent = {
      start: event.date,
      end: addHours(event.date, 1),
      title: 'TEST EVENT',
      cssClass: 'custom-event',
      color: {
        primary: '#488aff',
        secondary: '#bbd0f5'
      },
      resizable: {
        beforeStart: true,
        afterEnd: true
      },
      draggable: true
    }

    this.events.push(newEvent);
    this.refresh.next();
  }

}
It’s nice to have many options and configuration settings directly on the component, and working with the events of the type CalendarEvent works great as well.
Your calendar should now be ready and work like you’ve seen above!
Additional Formatting
If you want to take it one step further you can - of course - customise the view titles and different display options of the calendar. WE’ve created 2 providers in the beginning, let’s bring both of them to life.
The CustomDateFormatterProvider is used for almost all time and date related strings, therefore we override the functions inside our providers/custom-date-formatter/custom-date-formatter.ts like this:
import { CalendarDateFormatter, DateFormatterParams } from 'angular-calendar';
import { DatePipe } from '@angular/common';
import { Injectable } from '@angular/core';
import { getISOWeek } from 'date-fns';

@Injectable()
export class CustomDateFormatterProvider extends CalendarDateFormatter {

  public dayViewHour({ date, locale }: DateFormatterParams): string {
    return new DatePipe(locale).transform(date, 'HH:mm', locale);
  }

  public weekViewTitle({ date, locale }: DateFormatterParams): string {
    const year: string = new DatePipe(locale).transform(date, 'y', locale);
    const weekNumber: number = getISOWeek(date);
    return `Woche ${weekNumber} in ${year}`;
  }

  public weekViewColumnHeader({ date, locale }: DateFormatterParams): string {
    return new DatePipe(locale).transform(date, 'E', locale);
  }

  public weekViewColumnSubHeader({ date, locale }: DateFormatterParams): string {
    return new DatePipe(locale).transform(date, 'MM/dd', locale);
  }

}
You can see that I’m also setting a special German title here and change the formatting of the different labels to make them smaller for a mobile device.
Besides that, there’s a tooltip that pops up on an event and I don’t really like it, so heres the code to not show it anymore. Open your providers/custom-event-title-formatter/custom-event-title-formatter.ts and change it to:
import { CalendarEventTitleFormatter, CalendarEvent } from 'angular-calendar';
import { Injectable } from '@angular/core';

@Injectable()
export class CustomEventTitleFormatterProvider extends CalendarEventTitleFormatter {

  dayTooltip(event: CalendarEvent): string {
    return;
  }
}
Just creating those 2 providers and overriding the original functions is not enough in this case - we need to provide them for our module and tell it to use those 2 instead of the original files.
This is done in the same way you would use Ionic Native Mocks, simply add these entries to the array of providers inside your app/app.module.ts
{
  provide: CalendarDateFormatter,
  useClass: CustomDateFormatterProvider
},
{
  provide: CalendarEventTitleFormatter,
  useClass: CustomEventTitleFormatterProvider
}
Conclusion
So this was the Calendar Compendium, and you’ve seen one of the Calendar options in action now. Again, they all have their pros and cons and everyone has different needs for a Calendar.
The package presented is a good combination but it’s still lacking some mandatory stuff. Right now, you can drag and resize events only on one day, they can’t be moved to the next days. This is due to the implementation of the special week view, so if that’s a show stopper for you try one of the other alternatives!
Which Calendar have you used before?
I’m really interested in what else there might be to find the best possible solution for Ionic apps!
You can also find a video version of this article below.