Ionic AWS S3 Integration with NodeJS - Part 1: Server Last update: 2017-11-14
For long time the Amazaon Web Services (AWS) have been around and people love to use it as a backend or simply storage engine. In this series we will see how we can build an Ionic AWS App which can upload files from our Ionic app to a S3 bucket inside AWS with a simple NodeJS server in the middle!
You could also directly upload files to S3, but most of the time you have sensitive information that needs to be be protected from public access. Therefore, we will build a server in this first part which will do the handling of AWS and later the Ionic App will only have to use already signed URLs!
Part 2: Ionic AWS S3 Integration with NodeJS - Ionic App
Configuring Your AWS Account
First of all you need of course an AWS account which you can create for free.
Once you have your account, wee need to do 2 things:
- Create a new user for our backend
- Create a bucket in S3
To create a new user, navigate to the IAM service (Identity and Access Management) and click on Users in the menu to the left.
From there, click Add user add the top to create a new user. Inside the first step, give the user a name and make sure to check Programmatic access so our backend can communicate with AWS!

On the second step we need to give the user permissions to access our S3 bucket, therefore pick Attach existing policies directly and search for S3FullAccess and enable it. 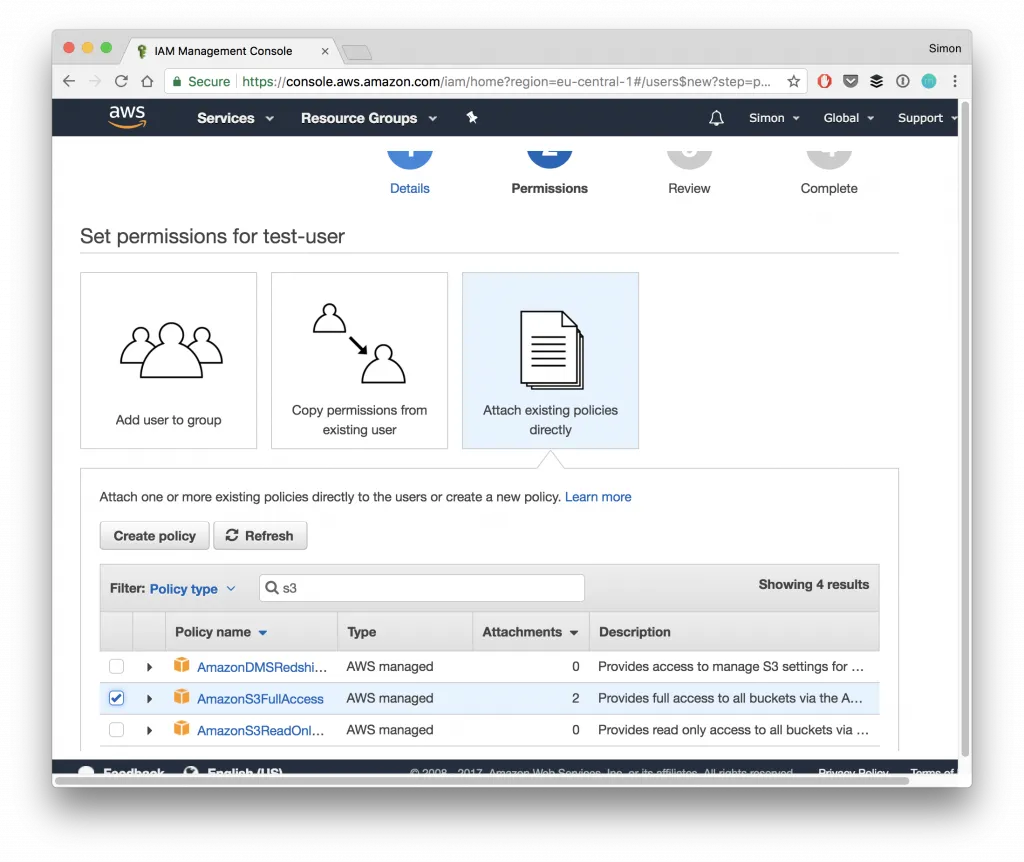
Now finish the last steps, and your user is created. As a result you get a screen with the user including the Access key ID and Secret access key which we need for our NodeJS backend.
Finally navigate to the S3 service and simply hit + Create bucket to create a new folder for the files we will upload. That’s all for the setup from the AWS side!
Setting up the Server
Our server is a simple NodeJS server using Express. It’s more or less the same general setup we used for the Ionic Image Upload tutorial.
Create an empty new folder and start by adding the package.json which is needed for our dependencies:
{
  "name": "devdacticAwsUpload",
  "version": "1.0.0",
  "description": "Backend for File upload to S3",
  "main": "server.js",
  "scripts": {
    "test": "echo "Error: no test specified" && exit 1"
  },
  "repository": {
    "type": "git"
  },
  "author": "Simon Reimler",
  "homepage": "https://devdactic.com",
  "dependencies": {
    "aws-sdk": "^2.83.0",
    "body-parser": "^1.15.2",
    "cors": "^2.8.1",
    "dotenv": "^0.4.0",
    "errorhandler": "^1.1.1",
    "express": "^4.14.0",
    "helmet": "^3.1.0",
    "morgan": "^1.7.0"
  },
  "devDependencies": {
  }
}
Now you can already run npm install to install all of our modules.
Next we need to setup our environment. We will make this backend Heroku ready, so we will later also use the Heroku CLI to start the server locally.
Because we do this, we can simply put our AWS keys into a .env file like this where you need to replace your keys and the bucket name you created previously:
S3_BUCKET=yourbucket
AWS_ACCESS_KEY_ID=yourKey
AWS_SECRET_ACCESS_KEY=yourSecretKey
Heroku will take care of loading the variables into our environment, and to make them better available for the rest of our app we add another secrets.js file which reads these properties:
module.exports = {
      aws_bucket: process.env.S3_BUCKET,
      aws_key: process.env.AWS_ACCESS_KEY_ID,
      aws_secret: process.env.AWS_SECRET_ACCESS_KEY,
};
Now the keys are stored secure inside the server and nobody besides our app will have access to them later. Remember that you shouldn’t add keys like this to your Ionic app as all the source code of your app can be read by other developers when they inspect your app!
Creating the AWS Controller
Next step is to implement the actual actions we want to perform on AWS using the AWS SDK.
First of all we create a general object which holds our region. This is different for me and you, but you can find the region when you open the AWS console inside your browser as ?region= attached to the URL!
Regarding the actual functions we have 4 use cases and routes:
- Get a signed request to PUT an object to the S3 bucket
- Get a signed request to a file of the S3 bucket
- Get a list of all files of the S3 bucket
- Delete a file from the S3 bucket
For all of this we can use the according calls of the AWS SDK within our controller.
Most of the times we have to specify a params object with the right keys to get the desired outcome.
If you have any question to these different functions and calls, just let me know below!
Otherwise they should be quite self explaining, so go ahead and create a new file in your folder called aws-controller.js and insert:
'use strict';

const aws = require('aws-sdk');
var secrets = require('./secrets');

const s3 = new aws.S3({
    signatureVersion: 'v4',
    region: 'eu-central-1' // Change for your Region, check inside your browser URL for S3 bucket ?region=...
});

exports.signedRequest = function (req, res) {
    const fileName = req.query['file-name'];
    const fileType = req.query['file-type'];
    const s3Params = {
        Bucket: secrets.aws_bucket,
        Key:   fileName,
        Expires: 60,
        ContentType: fileType,
        ACL: 'private'
    };

    s3.getSignedUrl('putObject', s3Params, (err, data) => {
        if (err) {
            console.log(err);
            return res.end();
        }
        const returnData = {
            signedRequest: data,
            url: `https://${secrets.aws_bucket}.s3.amazonaws.com/${fileName}`
        };

        return res.json(returnData);
    });
};

exports.getFileSignedRequest = function (req, res) {
    const s3Params = {
        Bucket: secrets.aws_bucket,
        Key: req.params.fileName,
        Expires: 60,
    };

    s3.getSignedUrl('getObject', s3Params, (err, data) => {
        return res.json(data);
    });
}


exports.listFiles = function (req, res) {
    const s3Params = {
        Bucket: secrets.aws_bucket,
        Delimiter: '/'
    };

    s3.listObjects(s3Params, function (err, data) {
        if (err) {
            console.log(err);
            return res.end();
        }
        return res.json(data);
    });
}

exports.deleteFile = function (req, res) {
    const s3Params = {
        Bucket: secrets.aws_bucket,
        Key: req.params.fileName
    };

    s3.deleteObject(s3Params, function (err, data) {
        if (err) {
            console.log(err);
            return res.end();
        }

        return res.status(200).send({ "msg": "File deleted" });
    });
};
Now we got all actions we need for our backend, we just need to connect them to the right routes.
Starting the Server & Adding Routes
The last file will start the actual server along with some packages which I usually use when developing a NodeJS backend like security, CORS handling, logging..
The most important part of this file is the routing.
We create three GET and one DELETE routes for our backend, which are simply routing the call to the according function of our controller.
The calls will either have the parameter directly inside the URL or attached as query params. This is of course up to you how you want your routes to look like, it’s just an example how it could be done.
Now go ahead and create the server.js file and insert:
var logger          = require('morgan'),
    cors            = require('cors'),
    http            = require('http'),
    express         = require('express'),
    dotenv          = require('dotenv'),
    errorhandler    = require('errorhandler'),
    bodyParser      = require('body-parser'),
    helmet          = require('helmet'),
    secrets = require('./secrets'),
    awsController = require('./aws-controller');

var app = express();
app.use(helmet())

dotenv.load();

app.use(bodyParser.urlencoded({ extended: true }));
app.use(bodyParser.json());
app.use(cors({origin:true,credentials: true}));

if (process.env.NODE_ENV === 'development') {
  app.use(logger('dev'));
  app.use(errorhandler())
}

app.get('/aws/sign', awsController.signedRequest);
app.get('/aws/files', awsController.listFiles);
app.get('/aws/files/:fileName', awsController.getFileSignedRequest);
app.delete('/aws/files/:fileName', awsController.deleteFile);

var port = process.env.PORT || 5000;
var server = http.createServer(app);

server.listen(port, function (err) {
  console.log('listening in http://localhost:' + port);
});
At the top of the post you can get the Postman collection I used for testing the backend directly to your inbox!
The PUT request is a bit tricky and you need to add a file (image) and select the body type binary, which results in a wrong content type set for the file inside your S3 bucket.
You can manually change this inside the Permissions tab of the file inside the AWS console, but anyway you should see the file appearing there!
In general the flow of the app will be:
- Get a signed request to upload a new file
- Call that URL from the app with a PUT call to upload an image to S3
- Get a list of all files of the bucket
- Resolve the names of the files to get a signed URL to each file
- Delete one file by it’s name (key)
You can do all of this already using Postman, so until the second part comes out you should be able to try the backend on your own!
Conclusion
The setup can be a bit tricky but should work flawless if all keys are correctly set up! Also, your app is now ready to be deployed to Heroku to make your backend available everywhere, not just on your local machine.
In the second part we will see how easy it is with the correct server setup to upload files to S3 from our Ionic app.
If you upload using Postman is not working, just let me know below.
You can also find a vide of this first part below!