How to Build an Ionic 4 App with SQLite Database & Queries (And Debug It!) Last update: 2019-04-16
If your app needs a solid database or you already got data that you want to inject in your Ionic application, there’s the great underlying SQLite database inside that week can use just like any other storage engine to store our data.
But the usage of the SQLite database is a bit more tricky than simply using Ionic Storage, so in this tutorial we will go through all the steps needed to prepare your app, inject some seed data and finally make different SQL queries on our database.
For a more up to date tutorial also check out the Building an SQLite Ionic App with Capacitor!
This tutorial is by no means a general SQL introduction, you should know a bit about it when you incorporate this into your Ionic 4 app!
Setting up our SQLite App
To get started we create a blank new app, add two pages and a service so we got something to work with and then install both the SQLite package and also the SQLite porter package plus the according Cordova plugins.
Now go ahead and run:
ionic start devdacticSql blank --type=angular
cd devdacticSql

ionic g service services/database
ionic g page pages/developers
ionic g page pages/developer

npm install @ionic-native/sqlite @ionic-native/sqlite-porter

ionic cordova plugin add cordova-sqlite-storage
ionic cordova plugin add uk.co.workingedge.cordova.plugin.sqliteporter
As said in the beginning, we will inject some initial seed data that you might have taken from your existing database. You could also infject JSON data using the porter plugin as well!
So for our case I created a simple file at assets/seed.sql and added this data for testing:
CREATE TABLE IF NOT EXISTS developer(id INTEGER PRIMARY KEY AUTOINCREMENT,name TEXT,skills TEXT,img TEXT);
INSERT or IGNORE INTO developer VALUES (1, 'Simon', '', 'https://pbs.twimg.com/profile_images/858987821394210817/oMccbXv6_bigger.jpg');
INSERT or IGNORE INTO developer VALUES (2, 'Max', '', 'https://pbs.twimg.com/profile_images/953978653624455170/j91_AYfd_400x400.jpg');
INSERT or IGNORE INTO developer VALUES (3, 'Ben', '', 'https://pbs.twimg.com/profile_images/1060037170688417792/vZ7iAWXV_400x400.jpg');

CREATE TABLE IF NOT EXISTS product(id INTEGER PRIMARY KEY AUTOINCREMENT,name TEXT, creatorId INTEGER);
INSERT or IGNORE INTO product(id, name, creatorId) VALUES (1, 'Ionic Academy', 1);
INSERT or IGNORE INTO product(id, name, creatorId) VALUES (2, 'Software Startup Manual', 1);
INSERT or IGNORE INTO product(id, name, creatorId) VALUES (3, 'Ionic Framework', 2);
INSERT or IGNORE INTO product(id, name, creatorId) VALUES (4, 'Drifty Co', 2);
INSERT or IGNORE INTO product(id, name, creatorId) VALUES (5, 'Drifty Co', 3);
INSERT or IGNORE INTO product(id, name, creatorId) VALUES (6, 'Ionicons', 3);
This SQL should create 2 tables in our database and inject a few rows of data. As you might have seen from the data, there are developers and also products, and products have the creatorId as a foreign key so we can build a nice join later!
Before using the plugins, like always, you need to make sure you add them to your app/app.module.ts and also the HttpClientModule as we need it to load our local SQL dump file, so go ahead and change it to:
import { NgModule } from '@angular/core';
import { BrowserModule } from '@angular/platform-browser';
import { RouteReuseStrategy } from '@angular/router';

import { IonicModule, IonicRouteStrategy } from '@ionic/angular';
import { SplashScreen } from '@ionic-native/splash-screen/ngx';
import { StatusBar } from '@ionic-native/status-bar/ngx';

import { AppComponent } from './app.component';
import { AppRoutingModule } from './app-routing.module';

import { SQLitePorter } from '@ionic-native/sqlite-porter/ngx';
import { SQLite } from '@ionic-native/sqlite/ngx';

import { HttpClientModule } from '@angular/common/http';

@NgModule({
  declarations: [AppComponent],
  entryComponents: [],
  imports: [BrowserModule, IonicModule.forRoot(), AppRoutingModule,
    HttpClientModule],
  providers: [
    StatusBar,
    SplashScreen,
    { provide: RouteReuseStrategy, useClass: IonicRouteStrategy },
    SQLite,
    SQLitePorter
  ],
  bootstrap: [AppComponent]
})
export class AppModule {}
Finally we need to make a tiny change to our routing to include the two pages we created. One will host lists of data, the second is to display the details for one entry so simply change the app/app-routing.module.ts to:
import { NgModule } from '@angular/core';
import { Routes, RouterModule } from '@angular/router';

const routes: Routes = [
  { path: '', redirectTo: 'developers', pathMatch: 'full' },
  { path: 'developers', loadChildren: './pages/developers/developers.module#DevelopersPageModule' },
  { path: 'developers/:id', loadChildren: './pages/developer/developer.module#DeveloperPageModule' },
];

@NgModule({
  imports: [RouterModule.forRoot(routes)],
  exports: [RouterModule]
})
export class AppRoutingModule { }
Alright, that’s everything for the setup phase, let’s dive into using all of this.
Accessing our SQLite Database with a Service
Because you don’t want to end up with all the database calls in your pages we build a service that holds all relevant functionality that our app needs (which is always a good idea).
In the constructor of our service we first need to perform a few steps:
- Wait until the platform is ready
- Create the database file, which will also open it if it already exists
- Fill the Database with our initial SQL data
All of this is simply chaining the different actions. But what’s more important is how to let your classes know the database is ready?
For this we are using a BehaviourSubject like we did in other scenarios with user authentication as well.
That means, our classes can later easily subscribe to this state to know when the database is ready. And we will also use this mechanism to store the data in our service as well in order to limit SQL queries.
But before we get into the SQL queries, go ahead with the first part of our services/database.service.ts and insert:
import { Platform } from '@ionic/angular';
import { Injectable } from '@angular/core';
import { SQLitePorter } from '@ionic-native/sqlite-porter/ngx';
import { HttpClient } from '@angular/common/http';
import { SQLite, SQLiteObject } from '@ionic-native/sqlite/ngx';
import { BehaviorSubject, Observable } from 'rxjs';

export interface Dev {
  id: number,
  name: string,
  skills: any[],
  img: string
}

@Injectable({
  providedIn: 'root'
})
export class DatabaseService {
  private database: SQLiteObject;
  private dbReady: BehaviorSubject<boolean> = new BehaviorSubject(false);

  developers = new BehaviorSubject([]);
  products = new BehaviorSubject([]);

  constructor(private plt: Platform, private sqlitePorter: SQLitePorter, private sqlite: SQLite, private http: HttpClient) {
    this.plt.ready().then(() => {
      this.sqlite.create({
        name: 'developers.db',
        location: 'default'
      })
      .then((db: SQLiteObject) => {
          this.database = db;
          this.seedDatabase();
      });
    });
  }

  seedDatabase() {
    this.http.get('assets/seed.sql', { responseType: 'text'})
    .subscribe(sql => {
      this.sqlitePorter.importSqlToDb(this.database, sql)
        .then(_ => {
          this.loadDevelopers();
          this.loadProducts();
          this.dbReady.next(true);
        })
        .catch(e => console.error(e));
    });
  }

  getDatabaseState() {
    return this.dbReady.asObservable();
  }

  getDevs(): Observable<Dev[]> {
    return this.developers.asObservable();
  }

  getProducts(): Observable<any[]> {
    return this.products.asObservable();
  }
}
Now we can focus on the second part which contains the actual SQL fun. Yeah!
Everything we do in the following functions is based on calling executeSql() on our database to perform whatever query you want to do.
The problematic part is actually going on once you get the data from database, as you need to iterate the rows of the result to get all the entries. For example to get all developers, we need to go through all rows and add them one by one to another array variable before we can finally use it.
In this example we also added a Typescript interface called Dev but that’s just some syntactic sugar on top!
Note: Because things were to easy I also wanted to show how to store an array under “skills”. To do so, you have to convert your data a few times and you’ll see it multiple times along the tutorial. When we read the data from the database we have to parse the JSON that we have written to it, because you can’t store an array as array in SQLite databases, that type doesn’t exist!
When you are done iterating the data you could return it, but we decided to simply call next() on our BehaviourSubject for developers (and later same for products) so again, everyone subscribed will receive the change!
By doing this you classes don’t have to make an additional call to receive new data all the time.
Let’s go ahead and add the second part inside your services/database.service.ts:
loadDevelopers() {
    return this.database.executeSql('SELECT * FROM developer', []).then(data => {
      let developers: Dev[] = [];

      if (data.rows.length > 0) {
        for (var i = 0; i < data.rows.length; i++) {
          let skills = [];
          if (data.rows.item(i).skills != '') {
            skills = JSON.parse(data.rows.item(i).skills);
          }

          developers.push({
            id: data.rows.item(i).id,
            name: data.rows.item(i).name,
            skills: skills,
            img: data.rows.item(i).img
           });
        }
      }
      this.developers.next(developers);
    });
  }

  addDeveloper(name, skills, img) {
    let data = [name, JSON.stringify(skills), img];
    return this.database.executeSql('INSERT INTO developer (name, skills, img) VALUES (?, ?, ?)', data).then(data => {
      this.loadDevelopers();
    });
  }

  getDeveloper(id): Promise<Dev> {
    return this.database.executeSql('SELECT * FROM developer WHERE id = ?', [id]).then(data => {
      let skills = [];
      if (data.rows.item(0).skills != '') {
        skills = JSON.parse(data.rows.item(0).skills);
      }

      return {
        id: data.rows.item(0).id,
        name: data.rows.item(0).name,
        skills: skills,
        img: data.rows.item(0).img
      }
    });
  }

  deleteDeveloper(id) {
    return this.database.executeSql('DELETE FROM developer WHERE id = ?', [id]).then(_ => {
      this.loadDevelopers();
      this.loadProducts();
    });
  }

  updateDeveloper(dev: Dev) {
    let data = [dev.name, JSON.stringify(dev.skills), dev.img];
    return this.database.executeSql(`UPDATE developer SET name = ?, skills = ?, img = ? WHERE id = ${dev.id}`, data).then(data => {
      this.loadDevelopers();
    })
  }

  loadProducts() {
    let query = 'SELECT product.name, product.id, developer.name AS creator FROM product JOIN developer ON developer.id = product.creatorId';
    return this.database.executeSql(query, []).then(data => {
      let products = [];
      if (data.rows.length > 0) {
        for (var i = 0; i < data.rows.length; i++) {
          products.push({
            name: data.rows.item(i).name,
            id: data.rows.item(i).id,
            creator: data.rows.item(i).creator,
           });
        }
      }
      this.products.next(products);
    });
  }

  addProduct(name, creator) {
    let data = [name, creator];
    return this.database.executeSql('INSERT INTO product (name, creatorId) VALUES (?, ?)', data).then(data => {
      this.loadProducts();
    });
  }
As you can see we implemented all of the basic operations like GET, CREATE, DELETE or UPDATE for the developers table. All of them follow the same scheme, you just need to make sure when you need to refresh your local data or what/how your functions return.
Same goes for the product table, here we are also using a little JOIN but again, that’s basic SQL (and actually my knowledge about more advanced SQL statements was lost after university).
Besides the general SQL queries you can also replace the values of your statements with some data by simply putting in a ? in the right places and then passing an array with arguments as the second parameter to the executeSql() function!
You could also do this inline within the string, that’s totally up to you. I just included some different ways to do it for the different calls in which we need to store data to the DB or find something by its ID.
Loading and Displaying our Database Rows
So by now we have created the layer that will return us all relevant data and functionality, let’s make use of it.
In our pages, especially the first, we need to make sure the database is ready by subscribing to the Observable of the state. Only once we know the database is ready, we can also use it safely.
Actually we could also subscribe to the developers and products before but just in case to make sure everything is fine we do it in there as well. Again in here I show two ways of doing it, you can either subscribe right here to the data and then use it locally or simply use the async pipe inside the view.
We also create the add functionality which only needs to be called on the service - remember, the array of our data will update and emit the new values automatically because we have added the calls in our service upfront after we add data.
At this point you also see another part of the array conversion: In the view it’s a simple input with comma separated values, so here we convert it to an array that will later be stringified for the database.
I know, storing the array would be more easy. Or having another table. Or saving it with commas. So many options to do everything!
Ok now go ahead and change the pages/developers/developers.page.ts to:
import { DatabaseService, Dev } from './../../services/database.service';
import { Component, OnInit } from '@angular/core';
import { Observable } from 'rxjs';

@Component({
  selector: 'app-developers',
  templateUrl: './developers.page.html',
  styleUrls: ['./developers.page.scss'],
})
export class DevelopersPage implements OnInit {

  developers: Dev[] = [];

  products: Observable<any[]>;

  developer = {};
  product = {};

  selectedView = 'devs';

  constructor(private db: DatabaseService) { }

  ngOnInit() {
    this.db.getDatabaseState().subscribe(rdy => {
      if (rdy) {
        this.db.getDevs().subscribe(devs => {
          this.developers = devs;
        })
        this.products = this.db.getProducts();
      }
    });
  }

  addDeveloper() {
    let skills = this.developer['skills'].split(',');
    skills = skills.map(skill => skill.trim());

    this.db.addDeveloper(this.developer['name'], skills, this.developer['img'])
    .then(_ => {
      this.developer = {};
    });
  }

  addProduct() {
    this.db.addProduct(this.product['name'], this.product['creator'])
    .then(_ => {
      this.product = {};
    });
  }

}
We’ve already had a lot of code in here so let’s keep the view short. At least the explanation.
We need a way to display both the developers and products, and for this we can use an ion-segment with two views.
Also, both views need a simple input so we can create new developers and also new products. For products, we also use a little select so we can assign a creator to a new product and use the ID of the creator as value. The select comes in really handy there!
That’s basically all the view needs to do. The only further thing is that clicking on a developer will bring us to the details page using the appropriate routerLink.
So go ahead and put this into your pages/developers/developers.page.html:
<ion-header>
  <ion-toolbar color="primary">
    <ion-title>Developers</ion-title>
  </ion-toolbar>
</ion-header>

<ion-content padding>

  <ion-segment [(ngModel)]="selectedView">
    <ion-segment-button value="devs">
      <ion-label>Developer</ion-label>
    </ion-segment-button>
    <ion-segment-button value="products">
      <ion-label>Products</ion-label>
    </ion-segment-button>
  </ion-segment>

  <div [ngSwitch]="selectedView">
    <div *ngSwitchCase="'devs'">
      <ion-item>
        <ion-label position="stacked">What's your name?</ion-label>
        <ion-input [(ngModel)]="developer.name" placeholder="Developer Name"></ion-input>
      </ion-item>
      <ion-item>
        <ion-label position="stacked">What are your special skills (comma separated)?</ion-label>
        <ion-input [(ngModel)]="developer.skills" placeholder="Special Skills"></ion-input>
      </ion-item>
      <ion-item>
        <ion-label position="stacked">Your image URL</ion-label>
        <ion-input [(ngModel)]="developer.img" placeholder="https://..."></ion-input>
      </ion-item>
      <ion-button expand="block" (click)="addDeveloper()">Add Developer Info</ion-button>

      <ion-list>
        <ion-item button *ngFor="let dev of developers" [routerLink]="['/', 'developers', dev.id]">
          <ion-avatar slot="start">
            <img [src]="dev.img">
          </ion-avatar>
          <ion-label>
            <h2>{{ dev.name }}</h2>
            <p>{{ dev.skills }}</p>
          </ion-label>
        </ion-item>
      </ion-list>
    </div>

    <div *ngSwitchCase="'products'">
      <ion-item>
        <ion-label position="stacked">Product name</ion-label>
        <ion-input [(ngModel)]="product.name" placeholder="Name"></ion-input>
      </ion-item>
      <ion-item>
        <ion-label position="stacked">Creator?</ion-label>
        <ion-select [(ngModel)]="product.creator">
          <ion-select-option *ngFor="let dev of developers" [value]="dev.id">{{ dev.name }}</ion-select-option>
        </ion-select>
      </ion-item>
      <ion-button expand="block" (click)="addProduct()">Add Product</ion-button>

      <ion-list>
        <ion-item *ngFor="let prod of products | async">
          <ion-label>
            <h2>{{ prod.name }}</h2>
            <p>Created by: {{ prod.creator }}</p>
          </ion-label>
        </ion-item>
      </ion-list>
    </div>
  </div>

</ion-content>
Now you can already run your app but remember, because we use Cordova plugins you need to execute it on a device!
Updating & Deleting data from the SQLite Database
Finally we need the simple view to update or delete a row of data. In there we can again make use of the service to first of all get the details for one database entry using the ID we passed through the route.
Again, to display the skills we need to have a little conversion in both directions when we update the database row. Nothing special besides that, so open your pages/developers/developer.page.ts and change it to:
import { DatabaseService, Dev } from './../../services/database.service';
import { Component, OnInit } from '@angular/core';
import { ActivatedRoute, Router } from '@angular/router';
import { ToastController } from '@ionic/angular';

@Component({
  selector: 'app-developer',
  templateUrl: './developer.page.html',
  styleUrls: ['./developer.page.scss'],
})
export class DeveloperPage implements OnInit {
  developer: Dev = null;
  skills = '';

  constructor(private route: ActivatedRoute, private db: DatabaseService, private router: Router, private toast: ToastController) { }

  ngOnInit() {
    this.route.paramMap.subscribe(params => {
      let devId = params.get('id');

      this.db.getDeveloper(devId).then(data => {
        this.developer = data;
        this.skills = this.developer.skills.join(',');
      });
    });
  }

  delete() {
    this.db.deleteDeveloper(this.developer.id).then(() => {
      this.router.navigateByUrl('/');
    });
  }

  updateDeveloper() {
    let skills = this.skills.split(',');
    skills = skills.map(skill => skill.trim());
    this.developer.skills = skills;

    this.db.updateDeveloper(this.developer).then(async (res) => {
      let toast = await this.toast.create({
        message: 'Developer updated',
        duration: 3000
      });
      toast.present();
    });
  }
}
Now we just need the last piece of code to display the details view - basically the same input fields we had before.
The only thing to note here is that the skills input is now an own variable which we filled after we got the initial developer data, and later we will use that variable to create the array which we then pass to the update function.
Wrap things up by changing your pages/developers/developer.page.html to:
<ion-header>
  <ion-toolbar color="primary">
    <ion-buttons slot="start">
      <ion-back-button defaultHref="developers"></ion-back-button>
    </ion-buttons>
    <ion-title>Developer</ion-title>
    <ion-buttons slot="end">
      <ion-button (click)="delete()">
        <ion-icon name="trash"></ion-icon>
      </ion-button>
    </ion-buttons>
  </ion-toolbar>
</ion-header>

<ion-content padding>
  <div *ngIf="developer">
    <ion-item>
      <ion-label position="stacked">What's your name?</ion-label>
      <ion-input [(ngModel)]="developer.name" placeholder="Developer Name"></ion-input>
    </ion-item>
    <ion-item>
      <ion-label position="stacked">What are your special skills (comma separated)?</ion-label>
      <ion-input [(ngModel)]="skills" placeholder="Special Skills"></ion-input>
    </ion-item>
    <ion-item>
      <ion-label position="stacked">Your image URL</ion-label>
      <ion-input [(ngModel)]="developer.img" placeholder="https://..."></ion-input>
    </ion-item>
    <ion-button expand="block" (click)="updateDeveloper()">Update Developer Info</ion-button>
  </div>
</ion-content>
That’s it for the code, but before we leave let’s quickly talk about debugging as I’m 100% there will be problems.
Debug Device Database
The biggest problem for most is debugging the code or in this case, debugging the database. We can’t simply run this code on the browser because we are using Cordova plugins, so all of the debugging needs to take place on a device/simulator!
So we need a way to access the database and check if it was created correctly, if data was added and so on, and to open the file you might want to get a tool like the SQLite Browser.
Android
For Android you can do all of the work from the command line. Simply build your app like always, install it with ADB and once you want to get the databse you can use the ADB shell as well to extract it from your app to your local filesystem like this:
ionic cordova build android

# Install the APK with adb install

# Run the app through the shell and copy the DB file
adb -d shell "run-as io.ionic.starter cat databases/data.db" > ~/androiddb.db
Just make sure that you are using the bundle ID of your application that you configured in the config.xml.
iOS
For iOS, things are a bit more complicated. But we have to distinguish between using the simulator or a real device.
So for the iOS simulator you can run a bunch of commands to get the active running simulator ID, then finding the folder on your system and finally finding the database in it like this:
# Find the ID of the running Simulator
$ ps aux | grep 'CoreSimulator/Devices'

# Use ID inside the Path!
$ cd  ~/Library/Developer/CoreSimulator/Devices/6EE9F4ED-C1FE-4CE8-854A-D228099E7D4A/data/

# Find the database file within the folder
$ find ./ -type f -name 'data.db'
If you are trying things out on your connected iOS device, you need to open Xcode -> Window -> Devices & Simulators to bring up a list of your connected devices.
In there you should see your device and the installed apps. From there, select your app, click the settings wheel and pick Download Container 
Hold on, we are not yet finished!
Find the container you just donwloaded and right click it and pick Show Package Contents which will let you dive into the application data. From there you can find the database file like in the image below. 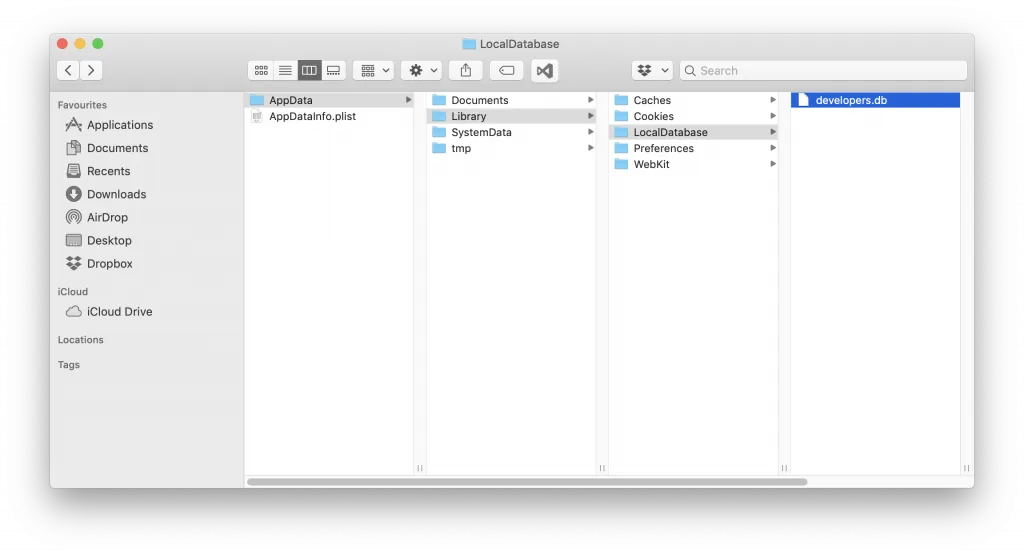
Now you can open the database file with the SQLite Browser (for example) and inspect all the data of your application!
Conclusion
Although it’s not super tricky to work with an SQLite database, things can take a lot of time as you always need to go through a new deployment when you test new functionality.
The good thing is we can debug all aspects of the process to find any errors and therefore build great apps with underlying SQL queries!
You can also find a video version of this tutorial below.