How to Build an Ionic 4 Calendar App Last update: 2019-03-19

Because there is still no calendar component directly shipping with Ionic 4 it’s time to revisit how to build one yourself using a great package we already used in a previous post.
The problem with creating a tutorial like this is that the need for a calendar view varies in almost every app. We’ll dive into building a calendar using the ionic2-calendar package which offers some different views and can be customised to some degree, but if you have very specific requirements you might need to create everything from the ground up yourself.

I’ve also talked about alternatives and using a different package inside Building a Calendar for Ionic With Angular Calendar & Calendar Alternatives.
Starting our Ionic 4 Calendar
We start with a blank app and add our calendar package. Don’t be shocked by the name - it still works great with v4 so go ahead and run:
ionic start devdacticCalendar blank --type=angular
cd devdacticCalendar
npm i ionic2-calendar
Now we don’t need to add it to our main module but to the actual module file of the page where we want to add the calendar. In our app we already got the default page so let’s simply add it to the app/home/home.module.ts like:
import { NgModule } from '@angular/core';
import { CommonModule } from '@angular/common';
import { IonicModule } from '@ionic/angular';
import { FormsModule } from '@angular/forms';
import { RouterModule } from '@angular/router';

import { HomePage } from './home.page';
import { NgCalendarModule  } from 'ionic2-calendar';

@NgModule({
  imports: [
    CommonModule,
    FormsModule,
    IonicModule,
    RouterModule.forChild([
      {
        path: '',
        component: HomePage
      }
    ]),
    NgCalendarModule
  ],
  declarations: [HomePage]
})
export class HomePageModule {}
There are no further imports for dates or whatsoever right now and we can dive right into it!
Creating the Calendar View
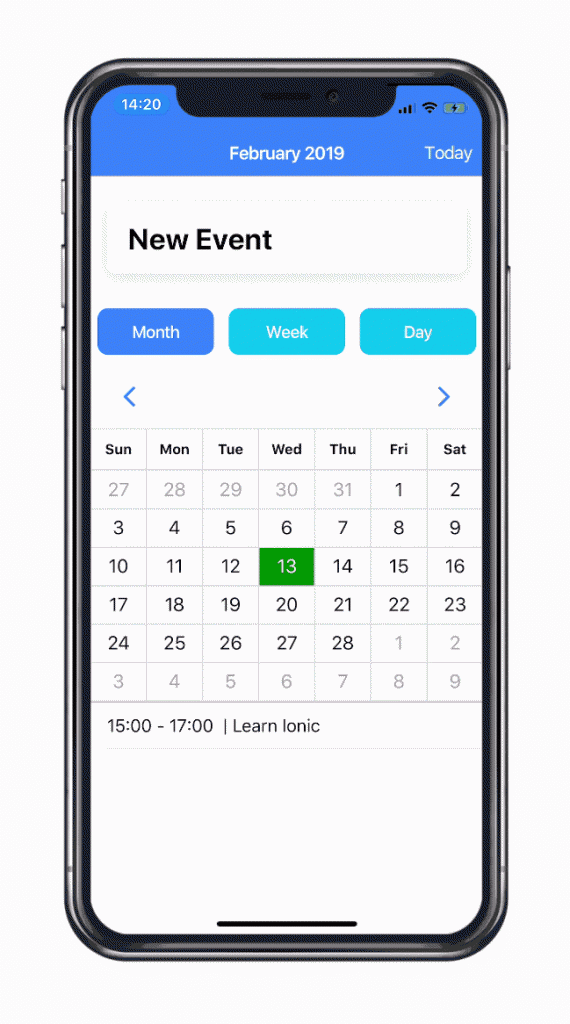
The first part of our view consists of a bunch of elements that we need to control the calendar and add new events.
We can control different aspects of the calendar, for example:
- Set the view to focus today
- Change the mode of the calendar which changes the view to month/week/day
- Move our calendar view forward/back
Also we add a little card to create a new event to our calendar because it will be pretty empty. You can also take a look at the demo code which uses a random events function to fill your calendar for testing!
All of these things are not really essential and the important part is at the end of our view: The actual calendar component!
On this component we can set a lot of models and functions and the best way to explore all of them is the options of the package.
You will see what the functions do and what’s used once we move on to the class, so for now just open your app/home/home.page.html and change it to:
<ion-header>
  <ion-toolbar color="primary">
    <ion-title>
      {{ viewTitle }}
    </ion-title>
    <ion-buttons slot="end">
      <ion-button (click)="today()">Today</ion-button>
    </ion-buttons>
  </ion-toolbar>
</ion-header>

<ion-content>

  <!-- Card for adding a new event -->
  <ion-card>
    <ion-card-header tappable (click)="collapseCard = !collapseCard">
      <ion-card-title>New Event</ion-card-title>
    </ion-card-header>
    <ion-card-content *ngIf="!collapseCard">

      <ion-item>
        <ion-input type="text" placeholder="Title" [(ngModel)]="event.title"></ion-input>
      </ion-item>
      <ion-item>
        <ion-input type="text" placeholder="Description" [(ngModel)]="event.desc"></ion-input>
      </ion-item>
      <ion-item>
        <ion-label>Start</ion-label>
        <ion-datetime displayFormat="MM/DD/YYYY HH:mm" pickerFormat="MMM D:HH:mm" [(ngModel)]="event.startTime" [min]="minDate"></ion-datetime>
      </ion-item>
      <ion-item>
        <ion-label>End</ion-label>
        <ion-datetime displayFormat="MM/DD/YYYY HH:mm" pickerFormat="MMM D:HH:mm" [(ngModel)]="event.endTime" [min]="minDate"></ion-datetime>
      </ion-item>
      <ion-item>
        <ion-label>All Day?</ion-label>
        <ion-checkbox [(ngModel)]="event.allDay"></ion-checkbox>
      </ion-item>
      <ion-button fill="outline" expand="block" (click)="addEvent()" [disabled]="event.title == ''">Add Event</ion-button>

    </ion-card-content>
  </ion-card>

  <ion-row>
    <!-- Change the displayed calendar mode -->
    <ion-col size="4">
      <ion-button expand="block" [color]="calendar.mode == 'month' ? 'primary' : 'secondary'" (click)="changeMode('month')">Month</ion-button>
    </ion-col>
    <ion-col size="4">
      <ion-button expand="block" [color]="calendar.mode == 'week' ? 'primary' : 'secondary'" (click)="changeMode('week')">Week</ion-button>
    </ion-col>
    <ion-col size="4">
      <ion-button expand="block" [color]="calendar.mode == 'day' ? 'primary' : 'secondary'" (click)="changeMode('day')">Day</ion-button>
    </ion-col>

    <!-- Move back one screen of the slides -->
    <ion-col size="6" text-left>
      <ion-button fill="clear" (click)="back()">
        <ion-icon name="arrow-back" slot="icon-only"></ion-icon>
      </ion-button>
    </ion-col>

    <!-- Move forward one screen of the slides -->
    <ion-col size="6" text-right>
      <ion-button fill="clear" (click)="next()">
        <ion-icon name="arrow-forward" slot="icon-only"></ion-icon>
      </ion-button>
    </ion-col>
  </ion-row>

  <calendar
  [eventSource]="eventSource"
  [calendarMode]="calendar.mode"
  [currentDate]="calendar.currentDate"
  (onEventSelected)="onEventSelected($event)"
  (onTitleChanged)="onViewTitleChanged($event)"
  (onTimeSelected)="onTimeSelected($event)"
  startHour="6"
  endHour="20"
  step="30"
  startingDayWeek="1">
  </calendar>

</ion-content>
The only fixed properties we have set are these:
- startHour/endHour: Pretty self explanatory, right?
- step: How detailed the hour blocks will be divided in the week/day view
- startingDayWeek: Welcome all US friends, in Germany the week starts on Monday so put a 0 or 1 here whatever you prefer
Now we need to put some logic behind all of this.
Note: We are using the calendar in its basic version. By now there’s really a lot you can customise, especially by using custom templates for cells and different other slots that you can easily add. If it doesn’t do the job immediately for you try to play around with these elements to make it fit your needs.
Adding the Calendar Logic
We start with the basics for adding new events. For this we will keep an array eventSource that we also previously connected to the calendar.
If you have an API where you pull the data from, you gonna add the data to this source as well!
Also, normally the events only consists of a title, the times and an all day flag but actually you can have more info in there like a description, id or whatever - you will see that it get’s passed through when you click on an even later.
We also have to make some date transformation as the ion-datetime expects an ISO string for the date while the calendar wants it to be a Date object.
Finally, if the new event should be an all day event we have to manually patch the starting and end times using a little transformation as well.
Now go ahead with the first part of your app/home/home.page.ts:
import { CalendarComponent } from 'ionic2-calendar/calendar';
import { Component, ViewChild, OnInit, Inject, LOCALE_ID } from '@angular/core';
import { AlertController } from '@ionic/angular';
import { formatDate } from '@angular/common';

@Component({
  selector: 'app-home',
  templateUrl: 'home.page.html',
  styleUrls: ['home.page.scss'],
})
export class HomePage implements OnInit {

  event = {
    title: '',
    desc: '',
    startTime: '',
    endTime: '',
    allDay: false
  };

  minDate = new Date().toISOString();

  eventSource = [];
  viewTitle;

  calendar = {
    mode: 'month',
    currentDate: new Date(),
  };

  @ViewChild(CalendarComponent) myCal: CalendarComponent;

  constructor(private alertCtrl: AlertController, @Inject(LOCALE_ID) private locale: string) { }

  ngOnInit() {
    this.resetEvent();
  }

  resetEvent() {
    this.event = {
      title: '',
      desc: '',
      startTime: new Date().toISOString(),
      endTime: new Date().toISOString(),
      allDay: false
    };
  }

  // Create the right event format and reload source
  addEvent() {
    let eventCopy = {
      title: this.event.title,
      startTime:  new Date(this.event.startTime),
      endTime: new Date(this.event.endTime),
      allDay: this.event.allDay,
      desc: this.event.desc
    }

    if (eventCopy.allDay) {
      let start = eventCopy.startTime;
      let end = eventCopy.endTime;

      eventCopy.startTime = new Date(Date.UTC(start.getUTCFullYear(), start.getUTCMonth(), start.getUTCDate()));
      eventCopy.endTime = new Date(Date.UTC(end.getUTCFullYear(), end.getUTCMonth(), end.getUTCDate() + 1));
    }

    this.eventSource.push(eventCopy);
    this.myCal.loadEvents();
    this.resetEvent();
  }
}
Now we are already able to add events to the calendar, but we also need some more functions that we connected inside the view previously.
Let’s talk about the them real quick so we can finish our basic calendar implementation:
- next/back: Manually change the view (which normally works by swiping) using the underlying Swiper instance because the calendar uses Ionic Slides
- changeMode: Change between the month/week/day views
- today: Focus back to the current date inside the calendar
- onViewTitleChanged: The view changed and the title is automatic updated
Next to these basic functionality we also receive the click event when we select an event inside the calendar.
As said before, here we get the full object from our source so if you use some API data you now got the ID and can easily show the details for an event. In our case we use the Angular date pie from code to transform the dates and then just present an alert for testing.
Finally whenever you click on a time slot in the calendar the onTimeSelected will be triggered and we use it to set the current start and end date of our event.
Normally you might want to immediately open an overlay to create a new event when a user clicks on a time slot like they are used to from Google or Apple calendar! We also have to make sure to use ISO strings for the date again at this point because of the component we used.
Now wrap up everything by adding these functions below your existing code inside the app/home/home.page.ts but of course still inside the class:
 // Change current month/week/day
 next() {
  var swiper = document.querySelector('.swiper-container')['swiper'];
  swiper.slideNext();
}

back() {
  var swiper = document.querySelector('.swiper-container')['swiper'];
  swiper.slidePrev();
}

// Change between month/week/day
changeMode(mode) {
  this.calendar.mode = mode;
}

// Focus today
today() {
  this.calendar.currentDate = new Date();
}

// Selected date reange and hence title changed
onViewTitleChanged(title) {
  this.viewTitle = title;
}

// Calendar event was clicked
async onEventSelected(event) {
  // Use Angular date pipe for conversion
  let start = formatDate(event.startTime, 'medium', this.locale);
  let end = formatDate(event.endTime, 'medium', this.locale);

  const alert = await this.alertCtrl.create({
    header: event.title,
    subHeader: event.desc,
    message: 'From: ' + start + '<br><br>To: ' + end,
    buttons: ['OK']
  });
  alert.present();
}

// Time slot was clicked
onTimeSelected(ev) {
  let selected = new Date(ev.selectedTime);
  this.event.startTime = selected.toISOString();
  selected.setHours(selected.getHours() + 1);
  this.event.endTime = (selected.toISOString());
}
You now got a fully functional calendar with a lot of ways to customise the appearance and react to user input and different events!
Conclusion
The Ionic2-calendar package remains one of the best ways to add a calendar to your Ionic app fast. If you depend on drag & drop functionality you still have to look somewhere else as this is not yet included (maybe in the future?).
Have you used a better calendar inside your Ionic app yet?
Let me know your experiences in the comments!
You can also find a video version of this article below.
