How to Parse, Visualise and Export CSV Data with Ionic Last update: 2017-09-19

Recently I came up with a new app idea and had to find a way to display and edit CSV data inside an Ionic app. There is no general way to achieve the visualisation like inside Excel, but actually there is an easy approach we can use to work with CSV data inside Ionic.
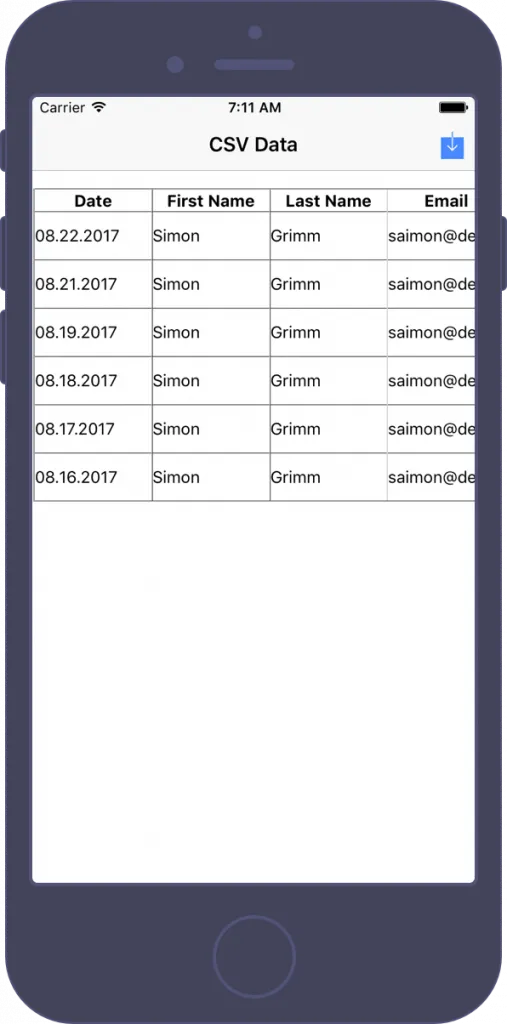
Inside this tutorial we will use the Papa Parse package to import and also export CSV data with Ionic. Inside the app we will then craft a table which allows us to see and change all the CSV data even on a small mobile screen like in the image below.
Setting up the CSV App
First of all we need some CSV data of course. For this tutorial we can use the dummy data below, but if you already have another CSV file you want to use feel free to do so!
Date,"First Name","Last Name","Email","Amount","Currency","InvoiceID","Country"
08.22.2017,"Simon","Grimm","saimon@devdactic.com","25,00","EUR","0001","GER"
08.21.2017,"Simon","Grimm","saimon@devdactic.com","25,00","EUR","0002","GER"
08.19.2017,"Simon","Grimm","saimon@devdactic.com","25,00","EUR","0003","GER"
08.18.2017,"Simon","Grimm","saimon@devdactic.com","25,00","EUR","0004","GER"
08.17.2017,"Simon","Grimm","saimon@devdactic.com","25,00","EUR","0005","GER"
08.16.2017,"Simon","Grimm","saimon@devdactic.com","25,00","EUR","0006","GER"
We will save that CSV data inside our app at src/assets/dummyData.csv but before we can do so we need to start a new blank Ionic app and install the needed packages plus typings for our app:
ionic start devdacticCSV blank
cd devdacticCSV
npm install papaparse --save
npm install @types/papaparse --save
Now you can copy in the CSV data file and also make sure to add the HttpModule to our src/app/app.module.ts as we need to load a local file:
import { BrowserModule } from '@angular/platform-browser';
import { ErrorHandler, NgModule } from '@angular/core';
import { IonicApp, IonicErrorHandler, IonicModule } from 'ionic-angular';
import { SplashScreen } from '@ionic-native/splash-screen';
import { StatusBar } from '@ionic-native/status-bar';

import { MyApp } from './app.component';
import { HomePage } from '../pages/home/home';

import { HttpModule } from '@angular/http';

@NgModule({
  declarations: [
    MyApp,
    HomePage
  ],
  imports: [
    BrowserModule,
    HttpModule,
    IonicModule.forRoot(MyApp)
  ],
  bootstrap: [IonicApp],
  entryComponents: [
    MyApp,
    HomePage
  ],
  providers: [
    StatusBar,
    SplashScreen,
    {provide: ErrorHandler, useClass: IonicErrorHandler}
  ]
})
export class AppModule {}
We’ve set up everything so far and can now jump into the fun of working with CSV!
Working with CSV Data
To get started we need to load and parse our CSV file. The package we used comes with almost all features we need already, and we can even keep it simple without further configuration as the parser will detect the format of the CSV and get the parsed values right.
In the beginning we will load the local file and parse it which results in an array with our values. We need to display the headline row special, so we move the first data block to an additional array. You could also keep it and remember that the first position is the column description, but I actually like to separate that meta information from the actual data array.
Besides the parsing we also implement the download function which will use the values of the current array inside the unparse() function of Papa Parse to return us a new CSV file. With a little HTML hack we instantly download the file, just as a demonstration if you use Ionic serve to see the changed CSV file.
Now go ahead and open your src/app/pages/home/home.ts and insert:
import { Component } from '@angular/core';
import { NavController } from 'ionic-angular';
import { Http } from '@angular/http';
import * as papa from 'papaparse';

@Component({
  selector: 'page-home',
  templateUrl: 'home.html'
})
export class HomePage {
  csvData: any[] = [];
  headerRow: any[] = [];

  constructor(public navCtrl: NavController, private http: Http) {
    this.readCsvData();
  }

  private readCsvData() {
    this.http.get('assets/dummyData.csv')
      .subscribe(
      data => this.extractData(data),
      err => this.handleError(err)
      );
  }

  private extractData(res) {
    let csvData = res['_body'] || '';
    let parsedData = papa.parse(csvData).data;

    this.headerRow = parsedData[0];

    parsedData.splice(0, 1);
    this.csvData = parsedData;
  }

  downloadCSV() {
    let csv = papa.unparse({
      fields: this.headerRow,
      data: this.csvData
    });

    // Dummy implementation for Desktop download purpose
    var blob = new Blob([csv]);
    var a = window.document.createElement("a");
    a.href = window.URL.createObjectURL(blob);
    a.download = "newdata.csv";
    document.body.appendChild(a);
    a.click();
    document.body.removeChild(a);
  }

  private handleError(err) {
    console.log('something went wrong: ', err);
  }

  trackByFn(index: any, item: any) {
    return index;
  }

}
Now our CSV data is already parsed into an array and we need a way to display the data. Therefore, we use a table with input fields for each value. If your table is small with only a few columns you might only need that, but most tables tend to be bigger so we wrap our table inside an ion-scroll and set the width of the table to a bigger value later trough CSS.
As we change the data of the array later when we use the app, we use the trackBy function like described in this thread. Besides that there is not really any magic, we craft the header row with the column titles and render the data inside a table below iterating first the rows and then each column of a row.
Finally we add a download button to the header so we can later download our changed data, Now go ahead and change your src/app/pages/home/home.html to:
<ion-header>
  <ion-navbar>
    <ion-title>
      CSV Data
    </ion-title>
    <ion-buttons end>
      <button ion-button icon-only (click)="downloadCSV()">
          <ion-icon name="download"></ion-icon>
        </button>
    </ion-buttons>
  </ion-navbar>
</ion-header>

<ion-content padding>
  <ion-scroll scrollX="true" scrollY="true" class="data-scroll">
    <table border="1" class="data-table">
      <tr>
        <td *ngFor="let header of headerRow" text-center><b>{{ header }}</b></td>
      </tr>
      <tr *ngFor="let row of csvData; let i = index">
        <td *ngFor="let data of row; let j = index; trackBy: trackByFn">
          <ion-input type="text" [(ngModel)]="csvData[i][j]"></ion-input>
        </td>
      </tr>
    </table>
  </ion-scroll>
</ion-content>
As mentioned before, we need some CSS to make the table bigger but also to tell the ion-scroll to cover the whole screen. Of course the size here is up to you and your needs, but for now change the src/pages/home/home.scss to:
page-home {
.data-scroll {
position: absolute;
top: 0;
bottom: 0;
left: 0;
right: 0;
}
.data-table {
min-width: 800px;
}
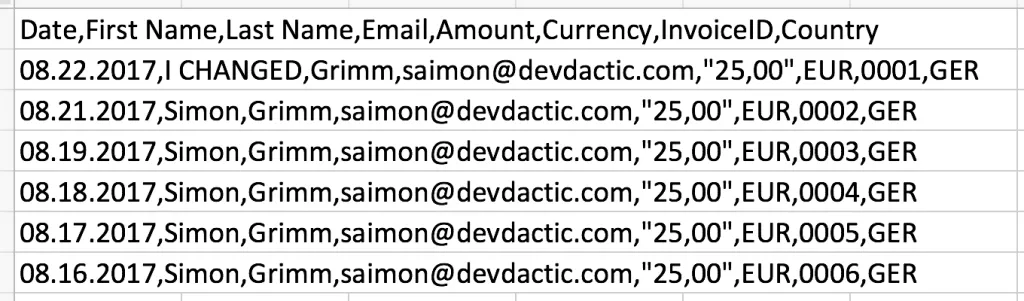
}That’s it! If you run your app now with serve or on a device you should see our CSV data rendered inside the table. You can change all values and finally even export the new CSV data and safe it to your computer. The result is the image below where one column was changed and it’s still super valid CSV data.
Conclusion
In this tutorial we explored a way to get CSV data into our Ionic app, work with the data and finally bring it back to CSV format. You could now add (as a little homework) a function to add new rows or columns so you can build your own Excel lite with Ionic.
Of course showing a table on a mobile device is not always the best idea, there is really limited space and you should be aware of that anytime.
But besides that, it is super simple to work with CSV data inside your Ionic app!
You can find a video version of this article below.