How to use Native Google Maps with Capacitor and Ionic Last update: 2021-09-07
If you want to use Google maps with Ionic, you can either go the easy route with the Web SDK or use the Capacitor wrapper to include native Google Maps right in your Ionic app.
In this tutorial we will use the Capacitor Google Maps plugin to include the native SDKs for Google Maps, which allows a more performant map display.
However, the plugin currently doesn’t support web so only use this option if you plan to build a pure native app for iOS and Android!
Google Maps project setup
Before we dive into the app, we need to configure a Project in the Google Cloud Platform console. Get started by clicking on your projects at the top and then selecting New Project.
 Pick whatever name you like and once the project is created, make sure you select it at the top so you can modify its settings.
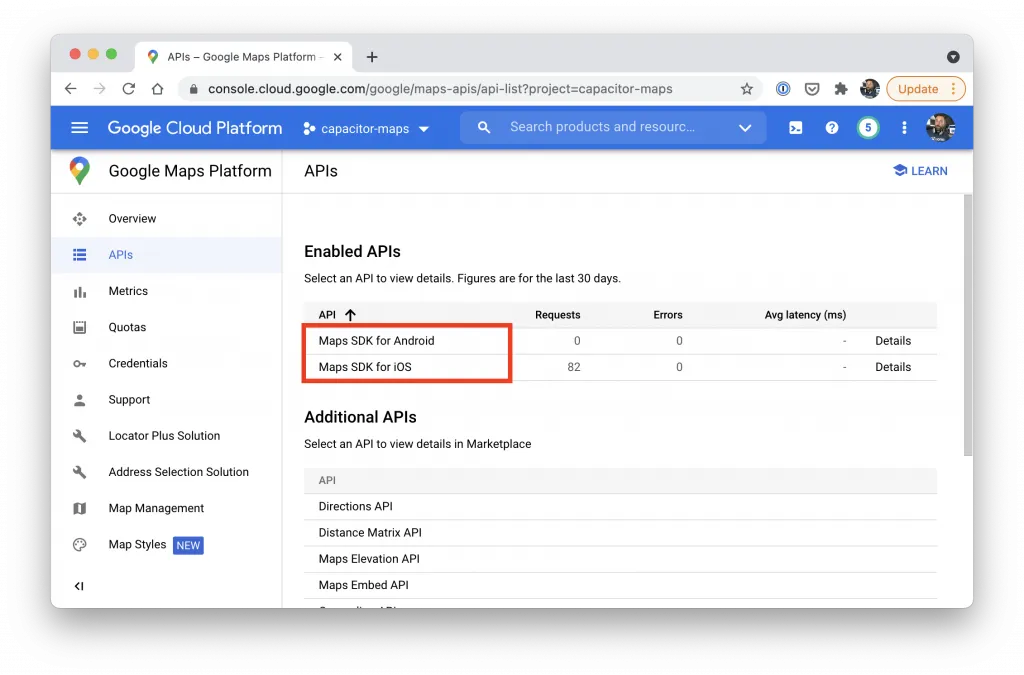
Now we need to enable the native SDKs, and we can do this by first selecting APIs & Services from the side and within go to Library.
You can filter for the native iOS and Android SDK, then select each of them and within the details page hit enable for both of them. 
If you now navigate to the Google MapsAPI list of your project you should see that both are enabled.
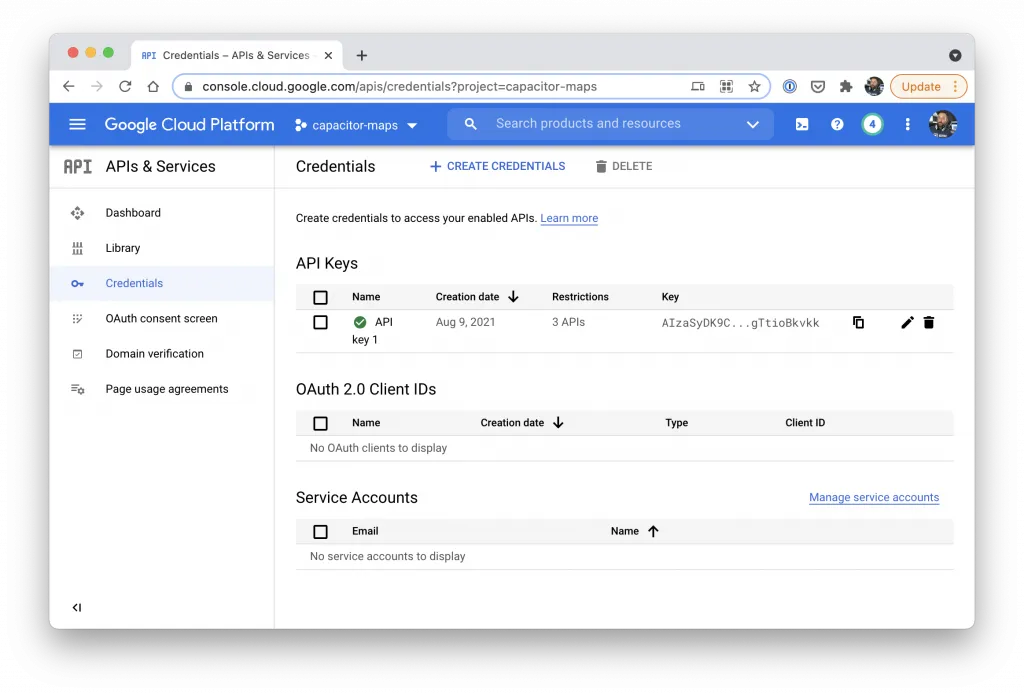
Finally we need to create an API key, and for now we can use the same key for iOS and Android.
To create one, simply navigate to Credentials within the APIs & Services menu and from there click Create Credentials. In the following menu select API key, and you are almost ready!
Note: The key is by default unrestricted, but you can restrict it to specific URLs or an app identifier. For production, I recommend to create an iOS and Android key and restrict them to your apps bundle identifier!
On top of that you can also restrict that key by only allowing access to certain Google APIs, like I did in the image below for our case.
If you see a warning about the OAuth consent screen you might have to configure it now (just go through the steps). But not 100% sure if it’s actually necessary for the API key!
Ionic Google Maps app
Now we can go into the Ionic app configuration for Google Maps, so create a blank new app and when the app is ready, install the plugin for our native Google Maps. I also added the Capacitor geolocation plugin so we directly work a bit more with our map:
ionic start devdacticMaps blank --type=angular --capacitor
cd ./devdacticMaps

npm i @capacitor-community/capacitor-googlemaps-native
npm install @capacitor/geolocation

ionic cap add ios
ionic cap add android
For now we will leave the app as it is because we need some platform specific changes first.
Configure Google Maps for Android
For Android we first need to supply our API key (the one we created above) inside the android/app/src/main/AndroidManifest.xml like this:
<application>

<!-- Other tags -->

<meta-data
        android:name="com.google.android.geo.API_KEY"
        android:value="MAPS_API_KEY"/>

<!-- Other tags -->

</application>
Because I also added the geolocation plugin to this tutorial, we need to add the required permissions at the bottom of that file where you can find the permissions comment already:
    <!-- Permissions -->
    <!-- Geolocation API -->
    <uses-permission android:name="android.permission.ACCESS_COARSE_LOCATION" />
    <uses-permission android:name="android.permission.ACCESS_FINE_LOCATION" />
    <uses-feature android:name="android.hardware.location.gps" />
Although I thought the next step would work automatically with Capacitor 3 it was mentioned as still required, so like before go ahead and import and register the Capacitor plugin inside the android/app/src/main/java/io/ionic/starter/MainActivity.java:
package io.ionic.starter;
import com.hemangkumar.capacitorgooglemaps.CapacitorGoogleMaps;

import com.getcapacitor.BridgeActivity;

public class MainActivity extends BridgeActivity {
    @Override
    public void onCreate(Bundle savedInstanceState) {
      super.onCreate(savedInstanceState);
      registerPlugin(CapacitorGoogleMaps.class);
    }
}
That’s all for Android, next step iOS.
Configure Google maps for iOS
Inside the native iOS project we don’t need to configure anything for native Google Maps! The only reason we apply a change here is the usage of the geolocation plugin.
In order to make the plugin work, open the ios/App/App/Info.plist and add two entries for the required permissions:
<key>NSLocationAlwaysUsageDescription</key>
  <string>We want to track you</string>
<key>NSLocationAlwaysAndWhenInUseUsageDescription</key>
  <string>We want your current position</string>
To use Google Maps we now add our API key first of all to the src/environments/environment.ts so we can easily access it later:
export const environment = {
  production: false,
  mapsKey: 'MAPS_API_KEY'
};
Although I said we don’t need to configure Google Maps in the native project we still need to inject the API key, but directly from our Ionic app!
Therefore I recommend you either put the initialize() right into the startup of your app, or defer it to a page where you actually use the map.
In our case, let’s open the src/app/app.component.ts and call it right in the beginning so we inject the API key into the native Google Maps plugin:
import { Component } from '@angular/core';
import { CapacitorGoogleMaps } from '@capacitor-community/capacitor-googlemaps-native';
import { environment } from '../environments/environment';

@Component({
  selector: 'app-root',
  templateUrl: 'app.component.html',
  styleUrls: ['app.component.scss'],
})
export class AppComponent {

  constructor() {
    CapacitorGoogleMaps.initialize({
      key: environment.mapsKey
    });
  }
}
Now we can finally work with our map.
Adding a simple native Google map view
To integrate a map we need to add one element to our markup, style it a bit with CSS and create all the logic and setup from code. Let’s start with the easiest part, which is including a map element in our src/app/home/home.page.html:
<ion-header>
  <ion-toolbar color="primary">
    <ion-title>
      Devdactic Maps
    </ion-title>
  </ion-toolbar>
</ion-header>

<ion-content>
  <div id="map" #map></div>
</ion-content>
To give that element a specific size, let’s add the following to the src/app/home/home.page.scss:
#map {
  height: 50vh;
}
Now we can access the map as a ViewChild and use the CapacitorGoogleMaps plugin to define all the specific settings.
Be aware that the DOM element should be already available, so in our case we use the ionViewDidEnter lifecycle event for that.
After defining the map we can directly add an event listener to wait until the map is fully ready. Once the event happens, we will also set the map type and start a function to display our current position (coming in the next step).
For now go ahead and change the src/app/home/home.page.ts to:
import { Component, ElementRef, ViewChild } from '@angular/core';
import { CapacitorGoogleMaps } from '@capacitor-community/capacitor-googlemaps-native';
import { Geolocation } from '@capacitor/geolocation';

@Component({
  selector: 'app-home',
  templateUrl: 'home.page.html',
  styleUrls: ['home.page.scss'],
})
export class HomePage {

  constructor() { }

  @ViewChild('map') mapView: ElementRef;

  ionViewDidEnter() {
    this.createMap();
  }

  createMap() {
    const boundingRect = this.mapView.nativeElement.getBoundingClientRect() as DOMRect;

    CapacitorGoogleMaps.create({
      width: Math.round(boundingRect.width),
      height: Math.round(boundingRect.height),
      x: Math.round(boundingRect.x),
      y: Math.round(boundingRect.y),
      zoom: 5
    });

    CapacitorGoogleMaps.addListener('onMapReady', async () => {
      CapacitorGoogleMaps.setMapType({
        type: "normal" // hybrid, satellite, terrain
      });

      this.showCurrentPosition();
    });
  }

  async showCurrentPosition() {
    // todo
  }

  ionViewDidLeave() {
    CapacitorGoogleMaps.close();
  }

}
At this point you can already run your app, but make sure you deploy it to a device!
To make testing a bit easier, I recommend to run it with livereload like this: ionic cap run ios --livereload --external --source-map=false
Once you can see the map on your device, you can continue with some more functionality.
Google map marker and user geolocation
We can now combine the map with the additionally installed geolocation plugin. For that, we should first request the necessary permissions (in case you haven’t done this at an earlier time) and then call getCurrentPosition() to get the exact user coordinates.
With that result we can add a marker for the user with some basic information (more to come afaik) and also call setCamera() on our map to focus the camera on the user location.
Go ahead and edit the according function inside the src/app/home/home.page.ts:
  async showCurrentPosition() {
    Geolocation.requestPermissions().then(async premission => {
      const coordinates = await Geolocation.getCurrentPosition();

      // Create our current location marker
      CapacitorGoogleMaps.addMarker({
        latitude: coordinates.coords.latitude,
        longitude: coordinates.coords.longitude,
        title: 'My castle of loneliness',
        snippet: 'Come and find me!'
      });

      // Focus the camera
      CapacitorGoogleMaps.setCamera({
        latitude: coordinates.coords.latitude,
        longitude: coordinates.coords.longitude,
        zoom: 12,
        bearing: 0
      });
    });
  }
If you run into trouble, double check that you are actually getting the coordinates of the user. I’ve used wrong permissions on iOS and you won’t really get a helpful error in that case. Only if you see the permissions dialog pop up you know that you should be fine to get the current user location.
Drawing on the map
On top of those basic things the map plugin allows many more functionalities like drawing lines or objects on the map, just like we did in the geolocation tracking tutorial with Firebase.
A simple example that would draw a straight line somewhere over Germany could look like this:
  draw() {
    const points: LatLng[] = [
      {
        latitude: 51.88,
        longitude: 7.60,
      },
      {
        latitude: 55,
        longitude: 10,
      }
    ];

    CapacitorGoogleMaps.addPolyline({
      points,
      color: '#ff00ff',
      width: 2
    });
  }
The only thing you need is an array of coordinates and then feed that information to the addPolyline() function of the plugin.
Listening to map events
In the beginning we already added one event listener to the ready event, but inside the interface definition you will find this block:
    addListener(eventName: 'didTap', listenerFunc: (results: any) => void): PluginListenerHandle;
    addListener(eventName: 'dragEnded', listenerFunc: (results: any) => void): PluginListenerHandle;
    addListener(eventName: 'didTapAt', listenerFunc: (results: any) => void): PluginListenerHandle;
    addListener(eventName: 'didTapPOIWithPlaceID', listenerFunc: (results: any) => void): PluginListenerHandle;
    addListener(eventName: 'didChange', listenerFunc: (results: any) => void): PluginListenerHandle;
    addListener(eventName: 'onMapReady', listenerFunc: (results: any) => void): PluginListenerHandle;
That means you can add your own event handlers to certain events when the user clicked on the map. An example for places of interest could look like this:
    CapacitorGoogleMaps.addListener('didTapPOIWithPlaceID', async (ev) => {
      const result = ev.results;

      const alert = await this.alertCtrl.create({
        header: result.name,
        message: `Place ID:  ${result.placeID}`,
        buttons: ['OK']
      });

      await alert.present();
    });
You could now use other Google APIs with the place ID to show more information or query the direction service for a route.
Conclusion
Including native Google Maps in your Ionic app can boost the performance as you are using the intended SDKs from Google wrapped inside the Capacitor plugin.
Some parts of the plugin are still WIP but the basic usage is straight forward and works flawless already.
You can also find a video version of this tutorial below.