How to Cache API Responses with Ionic & Capacitor Last update: 2021-06-01
If you don’t need the latest data and speed up loading times, a decent way to improve your performance is to cache API responses - and you can do it right away with some simple logic!
In this tutorial we will build our own Caching service to cache the JSON data from API calls using Ionic Storage and Capacitor.
There are packages available like Ionic cache, but actually we don’t need another package that is potentially not always up to data since it’s quite easy to do it on our own.
If you also want to keep track of online/offline status and queue up any POST request, also check out How to Build an Ionic Offline Mode App!
Ionic App Setup
To get started, bring up a new Ionic app and add two services to manage our API requests and the cached values.
Since caching request requires saving potentially a lot of data, we should use Ionic storage and on a device the underlying SQLite database, for which we need to Cordova plugin cordova-sqlite-storage and since we are using Capacitor, we just install it right away.
Go ahead with:
ionic start devdacticCaching blank --type=angular --capacitor
cd ./devdacticCaching

ionic g service services/api
ionic g service services/caching

# For Data Caching
npm install @ionic/storage-angular
npm install cordova-sqlite-storage
npm install localforage-cordovasqlitedriver
On top of that we need to install the driver for SQLite since Ionic Storage version 3, and we need to define the order in which storage engines are selected within our src/app/app.module.ts like this:
import { NgModule } from '@angular/core';
import { BrowserModule } from '@angular/platform-browser';
import { RouteReuseStrategy } from '@angular/router';

import { IonicModule, IonicRouteStrategy } from '@ionic/angular';

import { AppComponent } from './app.component';
import { AppRoutingModule } from './app-routing.module';

import { HttpClientModule } from '@angular/common/http';
import { IonicStorageModule } from '@ionic/storage-angular';
import * as CordovaSQLiteDriver from 'localforage-cordovasqlitedriver';
import { Drivers } from '@ionic/storage';

@NgModule({
  declarations: [AppComponent],
  entryComponents: [],
  imports: [BrowserModule,
    IonicModule.forRoot(),
    AppRoutingModule,
    HttpClientModule,
    IonicStorageModule.forRoot({
      driverOrder: [CordovaSQLiteDriver._driver, Drivers.IndexedDB]
    })],
  providers: [
    { provide: RouteReuseStrategy, useClass: IonicRouteStrategy }
  ],
  bootstrap: [AppComponent],
})
export class AppModule { }
Now Storage will use the Database on a device and fall back to IndexedDB inside the browser when SQLite is not available.
Building a Caching Service
Let’s begin by creating the hear of our logic, which handles all the interaction with Storage. The idea is pretty easy:
- Cache request (JSON) data by the URL plus a unique identifier (
cache_keyso we can find it more easily - Load cached data if it exists, check the self assigned time to live and either return the data or null
Since Storage v3 we also need to initialise it correctly, so we add a initStorage() function which we should call right in the beginning of our app.
To cache data, we will simply generate a validUntil value that we can check against the current time, and you could define your appropriate TTL at the top of the file.
The data is then simply stored under the URL key, and when we retrieve the data in our getCachedRequest() function we check the date again to either return the real data if it’s still valid or null in every other case.
Go ahead now and change the src/app/services/caching.service.ts to:
import { Injectable } from '@angular/core';
import { Storage } from '@ionic/storage';
import * as CordovaSQLiteDriver from 'localforage-cordovasqlitedriver'

// Expire time in seconds
const TTL = 60 * 60;
// Key to identify only cached API data
const CACHE_KEY = '_mycached_';

@Injectable({
  providedIn: 'root'
})
export class CachingService {

  constructor(private storage: Storage) { }

  // Setup Ionic Storage
  async initStorage() {
    await this.storage.defineDriver(CordovaSQLiteDriver);
    await this.storage.create();
  }

  // Store request data
  cacheRequest(url, data): Promise<any> {
    const validUntil = (new Date().getTime()) + TTL * 1000;
    url = `${CACHE_KEY}${url}`;
    return this.storage.set(url, {validUntil, data});
  }

  // Try to load cached data
  async getCachedRequest(url): Promise<any> {
    const currentTime = new Date().getTime();
    url = `${CACHE_KEY}${url}`;

    const storedValue = await this.storage.get(url);

    if (!storedValue) {
      return null;
    } else if (storedValue.validUntil < currentTime) {
      await this.storage.remove(url);
      return null;
    } else {
      return storedValue.data;
    }
  }

  // Remove all cached data & files
  async clearCachedData() {
    const keys = await this.storage.keys();

    keys.map(async key => {
      if (key.startsWith(CACHE_KEY)) {
        await this.storage.remove(key);
      }
    });
  }

  // Example to remove one cached URL
  async invalidateCacheEntry(url) {
    url = `${CACHE_KEY}${url}`;
    await this.storage.remove(url);
  }
}

</any></any>
We’ve also added a simple function to clear all cached data, which iterates all keys and checks for our custom CACHE_KEY to identify the entries we want to delete - otherwise we would wipe the whole storage and remove all keys that your app might have set in other places as well!
Now we just need to make sure we are calling our initialiser early enough, and a good place would be inside our src/app/app.component.ts:
import { Component } from '@angular/core';
import { CachingService } from './services/caching.service';

@Component({
  selector: 'app-root',
  templateUrl: 'app.component.html',
  styleUrls: ['app.component.scss'],
})
export class AppComponent {
  constructor(private cachingService: CachingService) {
    this.cachingService.initStorage();
  }
}
We’ve got the logic for caching in place, let’s load some data that we can actually store!
Loading & Caching API JSON Data
Inside our other service we perform the actual HTTP requests to the API, but we need to wrap calling the API in some more logic an create a getData() as we have some different cases:
- If we don’t have an active network connection, we will directly fallback to a cached value
- If we pass a
forceRefreshflag to the function we will always make a new HTTP call - If none of the above applies we will try to load the cached value
- If the cached value exists we can return it, if not we still need to make a new HTTP call at this point
It’s a basic logic covering all the possible scenarios that we could encounter. Remember that not getting cached data means either we never stored it or its TTL is expired!
The final HTTP call happens in yet another function callAndCache() since at this point we want to make sure we immediately cache the API result after getting the data so we have it locally available on our next call.
Every route you now want to call simply becomes a function with two lines where you create the URL and then call our function, like we do inside the getUsers() and getChuckJoke() functions or anything else you want to add.
Now open the src/app/services/api.service.ts and change it to:
import { HttpClient } from '@angular/common/http';
import { Injectable } from '@angular/core';
import { from, Observable, of } from 'rxjs';
import { map, switchMap, delay, tap } from 'rxjs/operators';
import { CachingService } from './caching.service';
import { Plugins } from '@capacitor/core';
import { ToastController } from '@ionic/angular';
const { Network } = Plugins;

@Injectable({
  providedIn: 'root'
})
export class ApiService {
  connected = true;

  constructor(private http: HttpClient, private cachingService: CachingService, private toastController: ToastController) {
    Network.addListener('networkStatusChange', async status => {
      this.connected = status.connected;
    });

    // Can be removed once #17450 is resolved: https://github.com/ionic-team/ionic/issues/17450
    this.toastController.create({ animated: false }).then(t => { t.present(); t.dismiss(); });
  }

  // Standard API Functions

  getUsers(forceRefresh: boolean) {
    const url = 'https://randomuser.me/api?results=10';
    return this.getData(url, forceRefresh).pipe(
      map(res => res['results'])
    );
  }

  getChuckJoke(forceRefresh: boolean) {
    const url = 'https://api.chucknorris.io/jokes/random';
    return this.getData(url, forceRefresh);
  }

  // Caching Functions

  private getData(url, forceRefresh = false): Observable<any> {

    // Handle offline case
    if (!this.connected) {
      this.toastController.create({
        message: 'You are viewing offline data.',
        duration: 2000
      }).then(toast => {
        toast.present();
      });
      return from(this.cachingService.getCachedRequest(url));
    }

    // Handle connected case
    if (forceRefresh) {
      // Make a new API call
      return this.callAndCache(url);
    } else {
      // Check if we have cached data
      const storedValue = from(this.cachingService.getCachedRequest(url));
      return storedValue.pipe(
        switchMap(result => {
          if (!result) {
            // Perform a new request since we have no data
            return this.callAndCache(url);
          } else {
            // Return cached data
            return of(result);
          }
        })
      );
    }
  }

  private callAndCache(url): Observable<any> {
    return this.http.get(url).pipe(
      delay(2000), // Only for testing!
      tap(res => {
        // Store our new data
        this.cachingService.cacheRequest(url, res);
      })
    )
  }
}
As you can see we also implemented a super simple mechanism for handling offline mode, but we could also move that logic to a interceptor instead or follow the approach of our offline mode app tutorial.
Using our API Caching Service
The last part now is just putting our logic to work, which is fairly easy since we just need to call the according functions from our src/app/home/home.page.ts:
import { Component } from '@angular/core';
import { ApiService } from '../services/api.service';
import { finalize } from 'rxjs/operators';
import { CachingService } from '../services/caching.service';
import { LoadingController } from '@ionic/angular';

@Component({
  selector: 'app-home',
  templateUrl: 'home.page.html',
  styleUrls: ['home.page.scss'],
})
export class HomePage {
  joke = null;
  users = null;

  constructor(private apiService: ApiService, private cachingService: CachingService, private loadingController: LoadingController) { }

  async loadChuckJoke(forceRefresh) {
    const loading = await this.loadingController.create({
      message: 'Loading data..'
    });
    await loading.present();

    this.apiService.getChuckJoke(forceRefresh).subscribe(res => {
      this.joke = res;
      loading.dismiss();
    });
  }

  async refreshUsers(event?) {
    const loading = await this.loadingController.create({
      message: 'Loading data..'
    });
    await loading.present();

    const refresh = event ? true : false;

    this.apiService.getUsers(refresh).pipe(
      finalize(() => {
        if (event) {
          event.target.complete();
        }
        loading.dismiss();
      })
    ).subscribe(res => {
      this.users = res;
    })
  }

  async clearCache() {
    this.cachingService.clearCachedData();
  }

}
I’ve wrapped the calls with a loading and the refreshUsers() is tied to an ion-refresher so we might have to end the refreshing event in that function - but overall it’s only calling the Observablke from our service, just like you would do in a regular case with the HttpClient and no caching in the background!
To test out the functionality, bring up a super easy with with a few buttons and controls like this inside the src/app/home/home.page.html:
<ion-header>
  <ion-toolbar color="primary">
    <ion-title>
      Devdactic Caching
    </ion-title>
    <ion-buttons slot="end">
      <ion-button (click)="clearCache()">
        <ion-icon slot="icon-only" name="trash"></ion-icon>
      </ion-button>
    </ion-buttons>
  </ion-toolbar>
</ion-header>

<ion-content>
  <ion-refresher slot="fixed" (ionRefresh)="refreshUsers($event)">
    <ion-refresher-content></ion-refresher-content>
  </ion-refresher>

  <ion-button expand="full" (click)="refreshUsers()">Load Users</ion-button>
  <ion-button expand="full" (click)="loadChuckJoke(false)">Load Joke</ion-button>
  <ion-button expand="full" (click)="loadChuckJoke(true)">Fresh Joke</ion-button>

  <ion-card *ngIf="joke">
    <ion-card-header>
      <ion-card-title>Latest Chuck Joke</ion-card-title>
    </ion-card-header>
    <ion-card-content class="ion-text-center">
      <img [src]="joke.icon_url">
      <ion-label>{{ joke.value }}</ion-label>
    </ion-card-content>
  </ion-card>

  <ion-list>
    <ion-item *ngFor="let user of users">
      <ion-avatar slot="start">
        <img [src]="user.picture.medium">
      </ion-avatar>
      <h2 class="ion-text-capitalize">{{ user.name?.first }} {{ user.name?.last }}</h2>
    </ion-item>
  </ion-list>

</ion-content>
When you now run your application, you can grab some data and then check the Storage/Application tab of your debugging tools and you should see the JSON data from the API stored under the URL key like this: 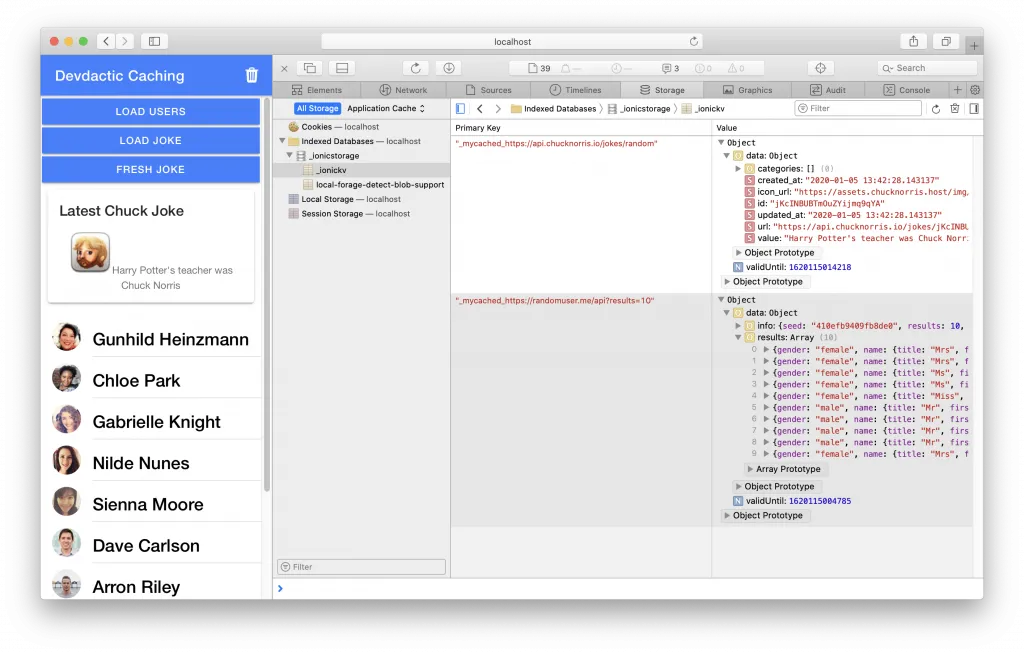
While the TTL isn’t reached the functions would now simply return the cached data, which you also notice as the results appear instantly and our API call has a 2 second delay for testing applied right now.
Conclusion
If you want to add caching to your Ionic app you don’t need to use an external package, some basic logic and services are all you need to store your API results locally and return them in case they are still valid.
Of course especially the TTL or when your app needs to reload data is different in every use case, but the basic logic will work and you can put your additional requirements on top of this logic!
Right now we are also using the full URL including query params for the storage key, maybe removing the params works better for you in some situations so you can implement sort of ”cache busting” by adding random params to the URL to force a reload of data.
You can also find a video version of this tutorial below. https://youtu.be/ysPxIVZGZTw