RESTful API User Authentication with Node.js and AngularJS - Part 1/2: Server Last update: 2015-11-17
My all time most viewed article is How To Handle User Authentication With AngularJS Inside Your Ionic App, and it’s also the one with the most questions. User authentication is one of the features almost every app(web and mobile) needs today. In this series I will show you my best practice for creating a RESTful API with user authentication. We will craft a little Node.js server which will allow us to sign up, authenticate and afterwards take request for protected endpoints. The second part will be how to build the frontend for such a REST backend.
The second part of this series on building the frontend will use the Ionic Framework with AngularJS to build a cross platform app, but the whole JS logic could be used in any AngularJS app.
RESTful API User Authentication with Node.js and AngularJS - Part 2/2: Frontend
I use Node.js because it’s simple and straightforward, but you could obviously have any framework in the backend you like (or already have). The concept stays the same, just keep in mind that REST means stateless so we don’t want to have any kind of session. The authentication is handled by passing a token to the user after successful login, which will be sent to the server with every request from then.
Setting up our little Node.js backend
Although I did not think about it, I used the complete MEAN stack for this series. This means (funny hu?):
- MongoDb - Our Database
- Expressjs - A simple server
- AngularJS - For our frontend later
- Node.js - Our backend framework
So please make sure you have everything installed, especially the MongoDB (I already had everything but the DB).
The folder structure for our backend looks like this, so go ahead and create a folder and also create empty files:
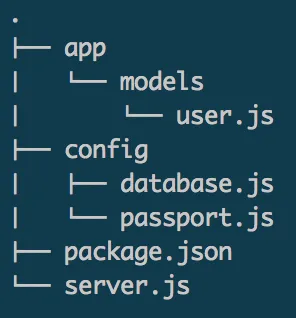 I will come to what’s inside those files later, for now just have the structure ready.
Next we need to install some Node packages, so open the package.json and insert this:
{
	"name": "node-rest-auth",
	"main": "server.js",
	"dependencies": {
		"bcrypt": "^0.8.5",
		"body-parser": "~1.9.2",
		"express": "~4.9.8",
		"jwt-simple": "^0.3.1",
		"mongoose": "~4.2.4",
		"morgan": "~1.5.0",
		"passport": "^0.3.0",
		"passport-jwt": "^1.2.1"
	}
}
We will use PassportJS for our security and use the JSON Web Token idea for our token. This is a recommended approach for all RESTful APIs, the JWT is and will become more and more the standard.
Additionally we will install some encryption for passwords, everything the server needs and a simple connector to our MongoDB.
Now go ahead and inside the root of your folder run:
npm installThis will install all our modules to node_modules/. Great!
Next we can start with the real server, so open the server.js and insert:
var express     = require('express');
var app         = express();
var bodyParser  = require('body-parser');
var morgan      = require('morgan');
var mongoose    = require('mongoose');
var passport	= require('passport');
var config      = require('./config/database'); // get db config file
var User        = require('./app/models/user'); // get the mongoose model
var port        = process.env.PORT || 8080;
var jwt         = require('jwt-simple');

// get our request parameters
app.use(bodyParser.urlencoded({ extended: false }));
app.use(bodyParser.json());

// log to console
app.use(morgan('dev'));

// Use the passport package in our application
app.use(passport.initialize());

// demo Route (GET http://localhost:8080)
app.get('/', function(req, res) {
  res.send('Hello! The API is at http://localhost:' + port + '/api');
});

// Start the server
app.listen(port);
console.log('There will be dragons: http://localhost:' + port);
So this code is quite self-explanatory, we import all the needed elements and create our server with a demo route and start it.
Next, open the config/database.js and add:
module.exports = {
  'secret': 'devdacticIsAwesome',
  'database': 'mongodb://localhost/node-rest-auth'
};
This is the path to our local MongoDB and an app secret for encoding our JWT.
Next thing we need is the user model for our user authentication. Therefore, open the app/models/user.js and add this:
var mongoose = require('mongoose');
var Schema = mongoose.Schema;
var bcrypt = require('bcrypt');

// Thanks to http://blog.matoski.com/articles/jwt-express-node-mongoose/

// set up a mongoose model
var UserSchema = new Schema({
  name: {
        type: String,
        unique: true,
        required: true
    },
  password: {
        type: String,
        required: true
    }
});

UserSchema.pre('save', function (next) {
    var user = this;
    if (this.isModified('password') || this.isNew) {
        bcrypt.genSalt(10, function (err, salt) {
            if (err) {
                return next(err);
            }
            bcrypt.hash(user.password, salt, function (err, hash) {
                if (err) {
                    return next(err);
                }
                user.password = hash;
                next();
            });
        });
    } else {
        return next();
    }
});

UserSchema.methods.comparePassword = function (passw, cb) {
    bcrypt.compare(passw, this.password, function (err, isMatch) {
        if (err) {
            return cb(err);
        }
        cb(null, isMatch);
    });
};

module.exports = mongoose.model('User', UserSchema);
So this might look a bit scary, but in general we only have a user with a unique name and a password as the schema for our DB. But we also don’t want to store the passwords in clear text, so whenever we want to save a user, we salt the password and store this value to our DB. This also means, we have to add a special compare method to compare those passwords, so we never get our hands on the real value of the user’s password!
Now the basics are set up, and you can start our server from now on just with:
node server.jsIf you get the log your server is running, go to http://localhost:8080 and you should see our demo route!
Creating our Strategy and User
As I already mentioned, we use PassportJS which uses the term of Strategy for specific authentication behaviour. With PassportJS you can combine all kinds of logins (even social logins!) and assign that behviour to specific routes. Crazy shit.
But we just need a JWT strategy for our RESTful API, so go ahead and open the config/passport.js and insert:
var JwtStrategy = require('passport-jwt').Strategy;

// load up the user model
var User = require('../app/models/user');
var config = require('../config/database'); // get db config file

module.exports = function(passport) {
  var opts = {};
  opts.secretOrKey = config.secret;
  passport.use(new JwtStrategy(opts, function(jwt_payload, done) {
    User.findOne({id: jwt_payload.id}, function(err, user) {
          if (err) {
              return done(err, false);
          }
          if (user) {
              done(null, user);
          } else {
              done(null, false);
          }
      });
  }));
};
What this config does? This code adds the JwtStrategy to our passport, and later you will se how to assign this specific strategy to a route. For now, this just defines how PassportJS tries to find a user with a given jwt_payload.id.
Next we need an endpoint to register new users. Inside our server.js add this code right below our dummy route:
// demo Route (GET http://localhost:8080)
// ...

// connect to database
mongoose.connect(config.database);

// pass passport for configuration
require('./config/passport')(passport);

// bundle our routes
var apiRoutes = express.Router();

// create a new user account (POST http://localhost:8080/api/signup)
apiRoutes.post('/signup', function(req, res) {
  if (!req.body.name || !req.body.password) {
    res.json({success: false, msg: 'Please pass name and password.'});
  } else {
    var newUser = new User({
      name: req.body.name,
      password: req.body.password
    });
    // save the user
    newUser.save(function(err) {
      if (err) {
        return res.json({success: false, msg: 'Username already exists.'});
      }
      res.json({success: true, msg: 'Successful created new user.'});
    });
  }
});

// connect the api routes under /api/*
app.use('/api', apiRoutes);
We now use our MongoDB connection when we start the server, so if you get an error now this means your MongoDB might not be running or installed correctly!
We also call our created passport strategy with the passport instance we have, and create a bundle for our routes so we can all cal them under /api/* later on.
The route we created is our sign up, which needs a name and password field. If those are given, we try to create a new user (where the password will be encrypted!) and save that user. If this is successful, we can report great success to the user!
At this point I encourage you to use Postman, an awesome tool to play around with your REST API. The request inside Postman would now look like this, including already the response after success:  I also used Robomongo to inspect my MongoDB and to see the created user object, but this tool is more or less optional.
User Authentication with JSON Web Token
We got our server, the strategy, the database model, the signup… now comes the fun!
As I said before, we want to authenticate a user and in return give him a token, which he should include in all further request. Let’s start with the authentication, so in your server.js add this right after our signup route:
// create a new user account (POST http://localhost:8080/signup)
// ...

// route to authenticate a user (POST http://localhost:8080/api/authenticate)
apiRoutes.post('/authenticate', function(req, res) {
  User.findOne({
    name: req.body.name
  }, function(err, user) {
    if (err) throw err;

    if (!user) {
      res.send({success: false, msg: 'Authentication failed. User not found.'});
    } else {
      // check if password matches
      user.comparePassword(req.body.password, function (err, isMatch) {
        if (isMatch && !err) {
          // if user is found and password is right create a token
          var token = jwt.encode(user, config.secret);
          // return the information including token as JSON
          res.json({success: true, token: 'JWT ' + token});
        } else {
          res.send({success: false, msg: 'Authentication failed. Wrong password.'});
        }
      });
    }
  });
});
There is really not much we have to do at this point, as this route needs to be unprotected. We just try to identify this user by finding him in our DB (remember the name was unique) and afterwards we use our compare function to check if the send token matches the stored&encrypted password.
If all of this was a success, we create a new JWT with the user object and encode it with our secret. This token will be returned to the user in the form of “JWT ” because PassportJS expected the token to look like this. Don’t kill the messenger. Take this image of postman as an excuse:

The last part now is to have some sort of protected route, so right below our authentication add this protected endpoint:
// route to authenticate a user (POST http://localhost:8080/api/authenticate)
// ...

// route to a restricted info (GET http://localhost:8080/api/memberinfo)
apiRoutes.get('/memberinfo', passport.authenticate('jwt', { session: false}), function(req, res) {
  var token = getToken(req.headers);
  if (token) {
    var decoded = jwt.decode(token, config.secret);
    User.findOne({
      name: decoded.name
    }, function(err, user) {
        if (err) throw err;

        if (!user) {
          return res.status(403).send({success: false, msg: 'Authentication failed. User not found.'});
        } else {
          res.json({success: true, msg: 'Welcome in the member area ' + user.name + '!'});
        }
    });
  } else {
    return res.status(403).send({success: false, msg: 'No token provided.'});
  }
});

getToken = function (headers) {
  if (headers && headers.authorization) {
    var parted = headers.authorization.split(' ');
    if (parted.length === 2) {
      return parted[1];
    } else {
      return null;
    }
  } else {
    return null;
  }
};
First of all, we assign our passport with the jwt strategy to this route. This means, before any of our code inside is executed, PassportJS will check if this user is allowed to see this route (by using the created strategy).
Afterwards, we need to extract the data from the JWT with mighty split function and decode our token. We can then find our user and send out a special greeting with his name to see that we actually found the right information and the user is in general allowed to see this.
This is just some dummy shit, but I think you get the point of how to handle things. The result would look like this: 
Conclusion
Implementing a RESTful API with user authentication is not that hard if you know how to do it. Authentication via JWT is a great and my recommended way, because it’s really easy to use and also very powerful. In the next part of this series I will show how to communicate with this backend properly using AngularJS inside an Ionic app (the concept and most of the code is plain AngularJS, if you don’t want it mobile).
Checkout the second part now: RESTful API User Authentication with Node.js and AngularJS - Part 2/2: Frontend
Happy Coding, Simon