AngularJS User Authentication Inside Your Ionic App Last update: 2015-04-22
Implementing a login and user authentication system for your AngularJS app seems to be one of the hardest problems people encounter. My article on a simple login with Ionic and AngularJS is the far most viewed article on this blog, every day! As the mentioned article only describes a basic system for a very low level security, this article will highlight everything you need for a complete user authentication and login inside your AngularJS app!
In particular this means, this article will show you how to:
- Log in a user and store the user session (Token based auth!)
- Protect your routes based on authentication status and role of the user
- Notice when an unauthorised request was made and a new login is required
As you can see, the complete package for a solid, production ready login system! My example implementation is inside an Ionic app, but most of the logic is just AngularJS. Whether you want user authentication inside your AngularJS app or in your hybrid app, this article is the way to go for you. So let’s start the fun, there is a lot of code! You can find a link to the complete project at the end of this article.
For a real backend with user authentication, check out my tutorial RESTful API User Authentication with Node.js and AngularJS
Setup everything we need
As I mentioned, we will create an Ionic project, so we start with a blank project and already install a bower dependency we will need later on. Run this from your command line:
ionic start devdactic-auth blank
cd devdactic-auth
bower install angular-mocks --save
Inside your created project, navigate to your www/js/ folder and create 3 files next to app.js: controllers.js, services.js and constants.js.
Now we need to include all those files, so open the index.html and add these lines to your import lines inside head:
<script src="js/controllers.js"></script>
<script src="js/services.js"></script>
<script src="js/constants.js"></script>
<script src="lib/angular-mocks/angular-mocks.js"></script>
Additional, we need to add the angular-mocks dependency to our module, so open the app.js and add it to the dependency array at the top of the file:
angular.module('starter', ['ionic', 'ngMockE2E'])We will need some more HTML files, so create these 5 files inside www/templates/: login.html, main.html, dashboard.html, public.html, admin.html.
That’s enough for now,let’s start with our user authentication coding!
Create some constants for our app
Before we create our routing, we have to define some constants which will be used everywhere in our app. This simplifies the broadcasting of events and definition of strings for roles. Open your constants.js and insert this:
angular.module('starter')

.constant('AUTH_EVENTS', {
  notAuthenticated: 'auth-not-authenticated',
  notAuthorized: 'auth-not-authorized'
})

.constant('USER_ROLES', {
  admin: 'admin_role',
  public: 'public_role'
});
Very simple, now we can access those strings through the created service everywhere inside our app! I got this one from Techniques for authentication in AngularJS applications, so thanks to Gert!
Create the views for our app
Out app will consist of a login screen, and a simple tabbed layout with 3 tabs. Those tabs will all be secured by our user authentication, so you won’t be able to access any of those routes without a prior login. Even if you run the app in the browser, you will not be able to access them directly via the URL, so this is the safest way to secure your app!
To get the correct layout, open the index.html and replace the body with:
<body ng-app="starter" ng-controller="AppCtrl">
	<ion-nav-bar class="bar-balanced">
	</ion-nav-bar>
	<ion-nav-view></ion-nav-view>
</body>
We have a navigation bar and a navigation view element which will display the view connected to the route. To get our app running as soon as possible, we also create the basic version of all the controllers we will need so open the controller.js and create the first version of it:
angular.module('starter')

.controller('AppCtrl', function() {})
.controller('LoginCtrl', function() {})
.controller('DashCtrl', function() {});
Our login view will consist of 2 input fields which are connected to scope variables and a button for the login action. Open the login.html and insert this:
<ion-view view-title="Sign-In" name="login-view">
  <ion-content class="padding">
      <div class="list list-inset">
          <label class="item item-input">
              <input type="text" placeholder="Username" ng-model="data.username">
          </label>
          <label class="item item-input">
              <input type="password" placeholder="Password" ng-model="data.password">
          </label>
      </div>
      <button class="button button-block button-positive" ng-click="login(data)">Login</button>
  </ion-content>
</ion-view>
The next view is the abstract view for our tabbed app in the logged in status. The 3 tabs are connected to routes, and will load the connected view inside its own nav-view. Open the main.html and insert:
<ion-view>
<ion-tabs class="tabs-icon-top tabs-balanced">
<ion-tab title="Dashboard" icon="ion-home" href="#/main/dash">
<ion-nav-view name="dash-tab"></ion-nav-view>
</ion-tab>
<ion-tab title="Public" icon="ion-earth" href="#/main/public">
<ion-nav-view name="public-tab"></ion-nav-view>
</ion-tab>
<ion-tab title="Secret" icon="ion-nuclear" href="#/main/admin">
<ion-nav-view name="admin-tab"></ion-nav-view>
</ion-tab>
</ion-tabs>
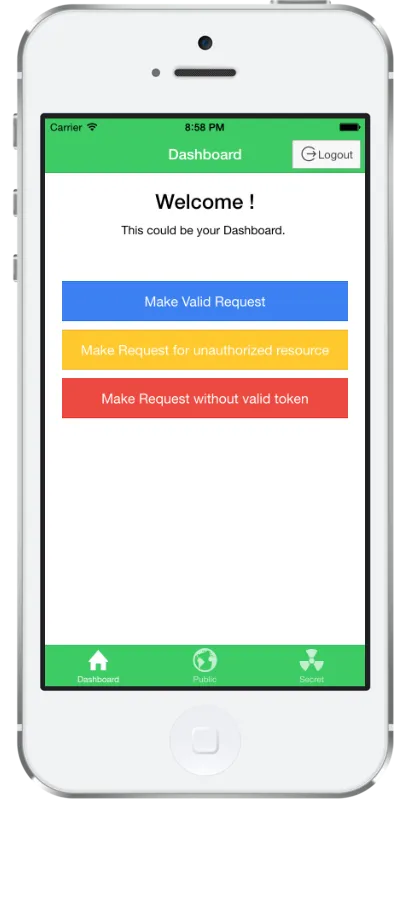
</ion-view>When the user is logged in, he will be on the dashboard. This view will consist of a greeting to the user, a logout button and 3 buttons to make different requests. All those actions won’t work right now as our controllers and services are not ready, but we already implement the view so we can take a first look at our app as soon as possible! Open the dashboard.html and insert this:
<ion-view view-title="Dashboard" name="dashboard-view">
  <ion-nav-buttons side="right">
    <button class="button icon-left ion-log-out button-stable" ng-click="logout()">Logout</button>
  </ion-nav-buttons>

  <ion-content class="padding">
    <div class="row"><div class="col text-center">
      <h3 class="title">Welcome {{username}}!</h3>
      This could be your Dashboard.
      <br><br><br>
      <button class="button button-full button-positive" ng-click="performValidRequest()">
        Make Valid Request
      </button>
      <button class="button button-full button-energized" ng-click="performUnauthorizedRequest()">
        Make Request for unauthorized resource
      </button>
      <button class="button button-full button-assertive" ng-click="performInvalidRequest()">
        Make Request without valid token
      </button>
      <br><br>
      {{response}}
    </div></div>
  </ion-content>
</ion-view>
The other 2 tabs are more a to demonstrate protection of specific routes based on the user role. Therefore, the views will just contain enough to see where you currently are inside your app. Open the public.html and insert:
<ion-view view-title="Public" name="dashboard-view">
  <ion-content class="padding">
      This is open for everyone!
  </ion-content>
</ion-view>
And finally the admin.html which will only be visible to users with the role Admin later:
<ion-view view-title="Admin" name="dashboard-view">
  <ion-content class="padding">
      This is the secret admin area!
  </ion-content>
</ion-view>
Those are all views we need. In general there is nothing special about them right now, but we will make sure to secure them in the next steps! We move on we the routing, to finally get a first glance at our app.
Interested in learning how to build apps with the Ionic Framework? Check out my complete step-by-step video course Ionic by Doing!
Implement the basic routing
The routing for our demo app is not very complex. As you have already seen, we have a login view, after which comes a tabbed interface with 3 tabs. The main route is the abstract route which holds the template for our tab bar, the 3 main.* routes are the 3 tabs.
The only thing special in here is the data object in the lines 37-39, which is connected to our admin tab. This is how we secure special routes, so only users with USER_ROLES.admin can access those routes! At this point it’s not working, but we will implement the check for those roles later. For now, open your app.js and add this:
.config(function ($stateProvider, $urlRouterProvider, USER_ROLES) {
  $stateProvider
  .state('login', {
    url: '/login',
    templateUrl: 'templates/login.html',
    controller: 'LoginCtrl'
  })
  .state('main', {
    url: '/',
    abstract: true,
    templateUrl: 'templates/main.html'
  })
  .state('main.dash', {
    url: 'main/dash',
    views: {
        'dash-tab': {
          templateUrl: 'templates/dashboard.html',
          controller: 'DashCtrl'
        }
    }
  })
  .state('main.public', {
    url: 'main/public',
    views: {
        'public-tab': {
          templateUrl: 'templates/public.html'
        }
    }
  })
  .state('main.admin', {
    url: 'main/admin',
    views: {
        'admin-tab': {
          templateUrl: 'templates/admin.html'
        }
    },
    data: {
      authorizedRoles: [USER_ROLES.admin]
    }
  });

  // Thanks to Ben Noblet!
  $urlRouterProvider.otherwise(function ($injector, $location) {
    var $state = $injector.get("$state");
    $state.go("main.dash");
  });
})
As we have included the angular-mocks to our app, we have to add one more thing to our app.js for now to get our first version up and running:
.run(function($httpBackend){
  $httpBackend.whenGET(/templates/w+.*/).passThrough();
})
This is a basic setting for the mock $httpBackend so our requests pass and we can access our views. Now go ahead and serve/deploy your app and you should see the logged in area with 3 tabs, as our fallback route is currently /main/dash. Let’s start the real user authentication!
Adding the user authentication service
Right now we just have a tab bar interface with 3 tabs. The one has a data object which says only users with the role admin allowed, but we don’t have any user authentication service. Let’s change that.
The authentication starts when a user tries to login. We will take the username and password and for the simplicity just act like we got a response token from our server. When working with a server, you will most of the time get some sort of token or session-id today, so we will storeUserCredentials inside our localStorage. Additional, we useCredentials which means we gather information from the token we have stored like the username or the role of a user, and most important we set the $http.defaults.headers.common['X-Auth-Token'] which means all of our next requests to the server will be signed with the token!
When working with REST APIs, this is most of the time the way to go. If you need more information about AngularJS and working with REST, check out my tutorial about REST calls with ng-resource.
The logout of our service reverts everything we have done on login and calls destroyUserCredentials, which means removing the token and the variables we have set.
To perform our security functions and blocking of routes we have 2 functions: isAuthenticated This is the basic authentication status you will need all the time when making some sort of user authentication. Here we just return whether the current user is logged in, which means we have validated his credentials and he is authenticated on our server. isAuthorized This is the special addition we added to our app, to block specific routes and actions. A user is authorized if he is logged in and has the correct role which is expected. This means, if a user has only USER_ROLES.public he has no rights to see the admin area!
Finally, whenever our service is created he automatically calls loadUserCredentials where we try to load a token from our localStorage. If we can get a token, we are happy and use it. At this point we don’t mind if it’s not valid anymore, because we will soon see why this doesn’t matter much here.
Now open your services.js and add our complete service:
angular.module('starter')

.service('AuthService', function($q, $http, USER_ROLES) {
  var LOCAL_TOKEN_KEY = 'yourTokenKey';
  var username = '';
  var isAuthenticated = false;
  var role = '';
  var authToken;

  function loadUserCredentials() {
    var token = window.localStorage.getItem(LOCAL_TOKEN_KEY);
    if (token) {
      useCredentials(token);
    }
  }

  function storeUserCredentials(token) {
    window.localStorage.setItem(LOCAL_TOKEN_KEY, token);
    useCredentials(token);
  }

  function useCredentials(token) {
    username = token.split('.')[0];
    isAuthenticated = true;
    authToken = token;

    if (username == 'admin') {
      role = USER_ROLES.admin
    }
    if (username == 'user') {
      role = USER_ROLES.public
    }

    // Set the token as header for your requests!
    $http.defaults.headers.common['X-Auth-Token'] = token;
  }

  function destroyUserCredentials() {
    authToken = undefined;
    username = '';
    isAuthenticated = false;
    $http.defaults.headers.common['X-Auth-Token'] = undefined;
    window.localStorage.removeItem(LOCAL_TOKEN_KEY);
  }

  var login = function(name, pw) {
    return $q(function(resolve, reject) {
      if ((name == 'admin' && pw == '1') || (name == 'user' && pw == '1')) {
        // Make a request and receive your auth token from your server
        storeUserCredentials(name + '.yourServerToken');
        resolve('Login success.');
      } else {
        reject('Login Failed.');
      }
    });
  };

  var logout = function() {
    destroyUserCredentials();
  };

  var isAuthorized = function(authorizedRoles) {
    if (!angular.isArray(authorizedRoles)) {
      authorizedRoles = [authorizedRoles];
    }
    return (isAuthenticated && authorizedRoles.indexOf(role) !== -1);
  };

  loadUserCredentials();

  return {
    login: login,
    logout: logout,
    isAuthorized: isAuthorized,
    isAuthenticated: function() {return isAuthenticated;},
    username: function() {return username;},
    role: function() {return role;}
  };
})
As said before, we don’t have to check if the token is valid: We will get informed anyway if we make a request with an invalid token! That’s why we need an interceptor. The interceptor will notice response errors on $http requests and therefore broadcast a message to our app. Still inside your services.js append this after your AuthService:
.factory('AuthInterceptor', function ($rootScope, $q, AUTH_EVENTS) {
  return {
    responseError: function (response) {
      $rootScope.$broadcast({
        401: AUTH_EVENTS.notAuthenticated,
        403: AUTH_EVENTS.notAuthorized
      }[response.status], response);
      return $q.reject(response);
    }
  };
})

.config(function ($httpProvider) {
  $httpProvider.interceptors.push('AuthInterceptor');
});
We need to push the interceptor in the config phase of our app startup so he gets registered for all the requests we make. Whenever we now make a request which returns 401 or 403, we broadcast a message. We will see how we can handle those messages when we add our controllers.
In general this means: We can rely on our token until we experience a bad request. At that point, we have to take action and inform the user what happened and why he might need to log in again.
Making the controllers for our app
Currently we have defined 3 controllers, which are already assigned to our views but don’t do anything. We change that and start with the most outer one, the AppCtrl.
We have assigned the AppCtrl to our body, so is meant to receive all the events we broadcast and handle them. Additional, the controller should have the current username in our example. If you have a bigger user object, this could be a place to have a reference to your current logged in user! Open your controllers.js and implement the first controller like this:
.controller('AppCtrl', function($scope, $state, $ionicPopup, AuthService, AUTH_EVENTS) {
  $scope.username = AuthService.username();

  $scope.$on(AUTH_EVENTS.notAuthorized, function(event) {
    var alertPopup = $ionicPopup.alert({
      title: 'Unauthorized!',
      template: 'You are not allowed to access this resource.'
    });
  });

  $scope.$on(AUTH_EVENTS.notAuthenticated, function(event) {
    AuthService.logout();
    $state.go('login');
    var alertPopup = $ionicPopup.alert({
      title: 'Session Lost!',
      template: 'Sorry, You have to login again.'
    });
  });

  $scope.setCurrentUsername = function(name) {
    $scope.username = name;
  };
})
When we receive a notAuthorized event, we inform the user about a not allowed request, and when we receive a notAuthenticated event we call AuthService.logout() and switch back to our login page. Additional we have a scope function to set our current user, so this can be used by all the child scopes later. Not very hard!
The next one is the LoginCtrl, which is assigned to our login page. Here we just have a scope object which will hold the data of the login form, and the login action. Again in your controllers.js implement the next controller:
.controller('LoginCtrl', function($scope, $state, $ionicPopup, AuthService) {
  $scope.data = {};

  $scope.login = function(data) {
    AuthService.login(data.username, data.password).then(function(authenticated) {
      $state.go('main.dash', {}, {reload: true});
      $scope.setCurrentUsername(data.username);
    }, function(err) {
      var alertPopup = $ionicPopup.alert({
        title: 'Login failed!',
        template: 'Please check your credentials!'
      });
    });
  };
})
On login, we call our AuthService, and if everything is correct we set the current username on the scope (this will cal the AppCtrl!) and move on to the dashboard state, which is the logged in area of our app.
The last controller we need is the DashCtrl. This controller is assigned to our dashboard and can perform 4 functions. The logout just calls our AuthService logout function and moves on to the login view. The other 3 functions try to perform requests to our mocked backend (we will come to them in the next chapter), and if possible display some sort of result inside the bottom area of our dashboard. Again in your controllers.js add:
.controller('DashCtrl', function($scope, $state, $http, $ionicPopup, AuthService) {
  $scope.logout = function() {
    AuthService.logout();
    $state.go('login');
  };

  $scope.performValidRequest = function() {
    $http.get('http://localhost:8100/valid').then(
      function(result) {
        $scope.response = result;
      });
  };

  $scope.performUnauthorizedRequest = function() {
    $http.get('http://localhost:8100/notauthorized').then(
      function(result) {
        // No result here..
      }, function(err) {
        $scope.response = err;
      });
  };

  $scope.performInvalidRequest = function() {
    $http.get('http://localhost:8100/notauthenticated').then(
      function(result) {
        // No result here..
      }, function(err) {
        $scope.response = err;
      });
  };
});
Those requests will later demonstrate what happens when a user tries to access resources without permissions, or without being logged in (e.g. his session is lost/timed out). Right now they won’t work, so let’s add a little mock backend!
Dummy backend for faking request response codes
We already have a basic setting for our mock backend inside our app.js, now we need to add some more routes. Find the run function for the $httpBackend and replace it with:
.run(function($httpBackend){
  $httpBackend.whenGET('http://localhost:8100/valid')
        .respond({message: 'This is my valid response!'});
  $httpBackend.whenGET('http://localhost:8100/notauthenticated')
        .respond(401, {message: "Not Authenticated"});
  $httpBackend.whenGET('http://localhost:8100/notauthorized')
        .respond(403, {message: "Not Authorized"});

  $httpBackend.whenGET(/templates/w+.*/).passThrough();
 })
We already had the las line, the first 3 requests are new. We simple mock some responses for those routes, which are the ones used by our DashCtrl. By doing this, we can easily try how our app responds when it encounters a 401 or 403. Our App is almost finished, but the last one is the most important of all!
For a real backend with user authentication, check out my tutorial RESTful API User Authentication with Node.js and AngularJS
Intercept all the state changes!
Right now there is no check if a user is authenticated when trying to access the logged in states. This means, anyone who changes the URL could access those pages without any problems. Here’s how AngularJS solves this.
We catch the route change event, which is always called when moving to a new state. At that point it’s the best time to see if someone who tries to access something indeed has the permissions to see it! Open your app.js and append this at the end:
.run(function ($rootScope, $state, AuthService, AUTH_EVENTS) {
  $rootScope.$on('$stateChangeStart', function (event,next, nextParams, fromState) {

    if ('data' in next && 'authorizedRoles' in next.data) {
      var authorizedRoles = next.data.authorizedRoles;
      if (!AuthService.isAuthorized(authorizedRoles)) {
        event.preventDefault();
        $state.go($state.current, {}, {reload: true});
        $rootScope.$broadcast(AUTH_EVENTS.notAuthorized);
      }
    }

    if (!AuthService.isAuthenticated()) {
      if (next.name !== 'login') {
        event.preventDefault();
        $state.go('login');
      }
    }
  });
})
When we catch the change, we check 2 things: Has the user the correct role (if specified by the route), otherwise we prevent the change event, reload the current page a broadcast the notAuthorized event. Is the user authenticated? If not, we prevent the change event and go back to the login page, but only if we are not already on the journey to the login page (had a funny infinite loop with that one..).
And that’s it folks! Run your app inside a browser, mobile device, wherever you want. Connect it with your existing backend and receive a real token, do whatever you like. If you have any questions or ideas for improvements, just let me know!
Conclusion
In this tutorial I explained how to implement a complete AngularJS user authentication system for a web-app or especially a mobile hybrid app. We used angular-mocks for a dummy backend, and created a tabbed app which not only checks for the authentication status of a user but also the user role (role based authentication). Sorry for the very long article, but I felt this would be better inside one complete “guide” then split into 2 posts. If you are a lazy developer, you can find the complete code for this article on my Github repo for this article.
If you want to learn more about Ionic 2 and build your own apps, make sure to also checkout Zero To App now!
See a video version of this article below.
If this tutorial was helpful, follow me on twitter @schlimmson and leave a comment/ tweet it!
Interested in learning how to build apps with the Ionic Framework? Check out my complete step-by-step video course Ionic by Doing!
Code on, Simon