Ionic Canvas Drawing and Saving Images as Files Last update: 2018-04-17

Working with the canvas can be challenging, but there are amazing things you can’t build using it like this little drawing application which can also save your amazing paintings inside the apps folder and load all of them again!
Along this tutorial we will implement a canvas inside our Ionic app on which we can draw in different colours. We’ll then store the canvas data as a new image inside our app and keep the information inside Ionic storage so we can access all of our paintings later.
If you don’t really need the drawing part you can also check out this signature pad tutorial which describes how to build a simple input for a signature below any document.
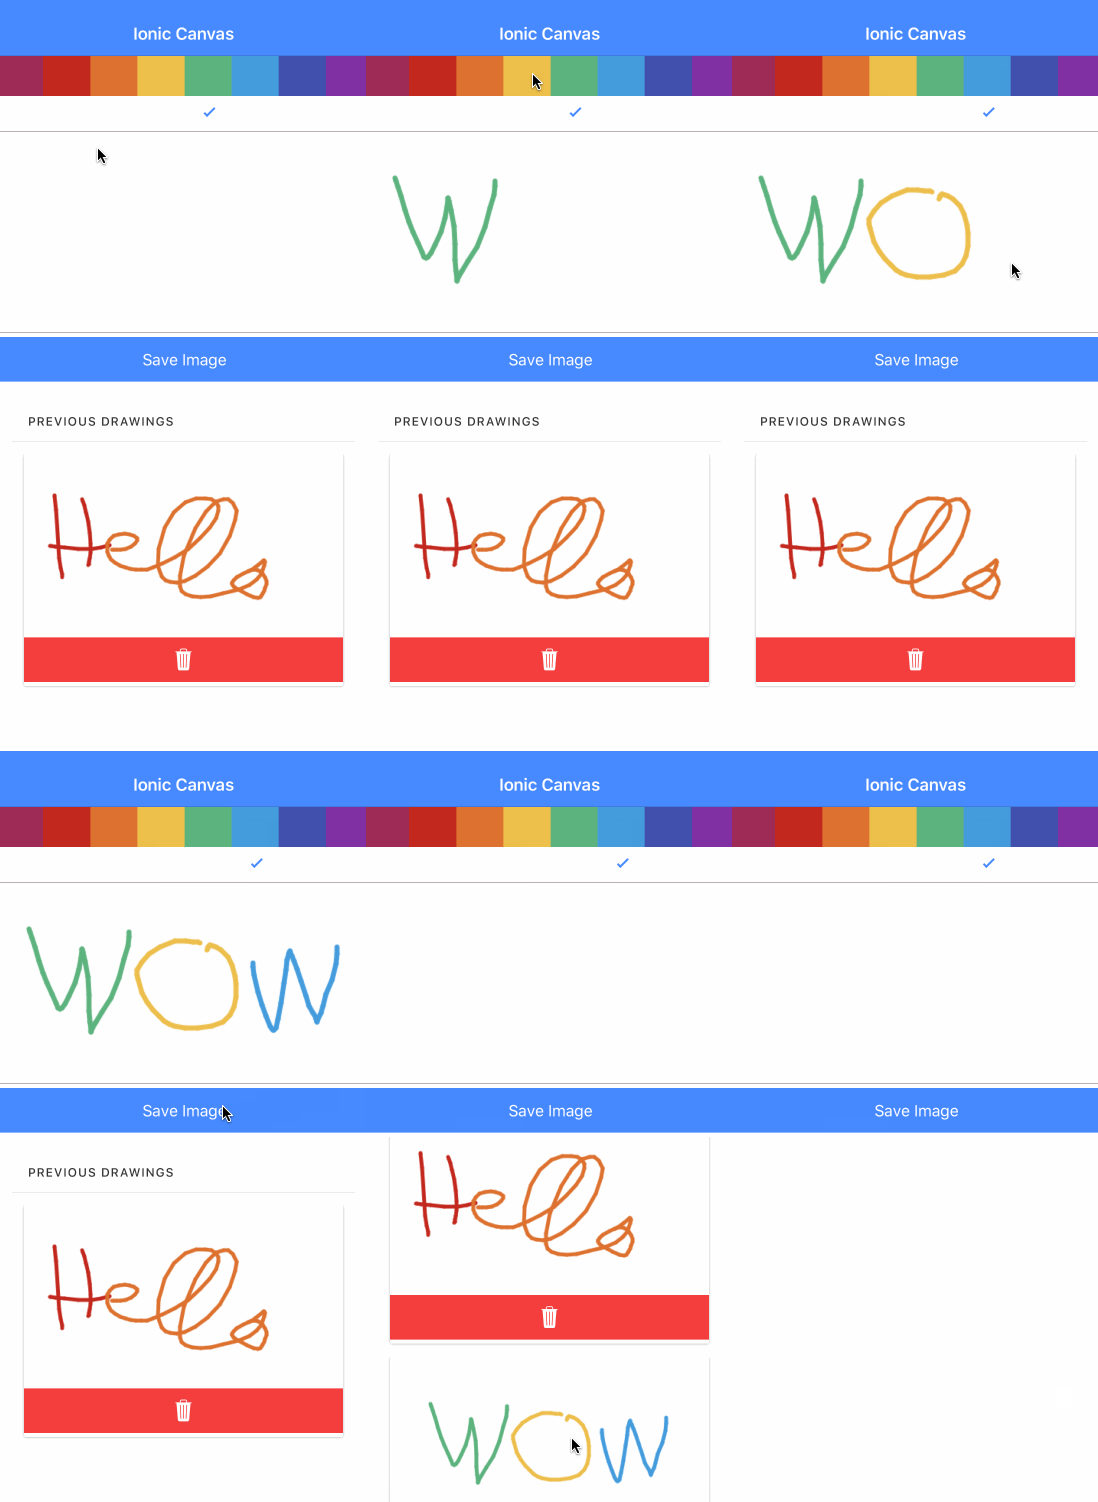
The final result will look like the image below, so let’s get started with our drawing app!

Starting Our Drawing App
We start with a blank Ionic app and add the Cordova plugins for the Ionic storage and also the File so we can write a new file to the filesystem of our device later. Go ahead and run:
ionic start devdacticImageCanvas blank
cd devdacticImageCanvas
ionic cordova plugin add cordova-sqlite-storage
ionic cordova plugin add cordova-plugin-file
npm install --save @ionic-native/file
Now make sure to import everything correctly into your app/app.module.ts like this:
import { BrowserModule } from '@angular/platform-browser';
import { ErrorHandler, NgModule } from '@angular/core';
import { IonicApp, IonicErrorHandler, IonicModule } from 'ionic-angular';
import { SplashScreen } from '@ionic-native/splash-screen';
import { StatusBar } from '@ionic-native/status-bar';

import { MyApp } from './app.component';
import { HomePage } from '../pages/home/home';

import { File } from '@ionic-native/file';
import { IonicStorageModule } from '@ionic/storage';

@NgModule({
  declarations: [
    MyApp,
    HomePage
  ],
  imports: [
    BrowserModule,
    IonicModule.forRoot(MyApp),
    IonicStorageModule.forRoot()
  ],
  bootstrap: [IonicApp],
  entryComponents: [
    MyApp,
    HomePage
  ],
  providers: [
    StatusBar,
    SplashScreen,
    {provide: ErrorHandler, useClass: IonicErrorHandler},
    File
  ]
})
export class AppModule {}
There are no further dependencies as the canvas is always available so that’s all from the configuration side!
Building the Canvas Drawing View
Before we get into the class logic let’s craft a simple view. Our app needs the actual canvas element along with the functions to recognise the touches and movement on the canvas. Also, we have a list of all stored images below the canvas and to make the app more user friendly we need to fix the canvas (or the surrounding div) at the top of the app.
For this, we can use the ion-fixed attribute but still need some manual coding as this would otherwise result in a very strange looking UI where our elements overlap!
Above our canvas we also add a simple selection of colours using a radio-group plus some additional logic to make it look and feel better.
For now, open your pages/home/home.html and change it to:
<ion-header>
  <ion-navbar color="primary">
    <ion-title>
      Ionic Canvas
    </ion-title>
  </ion-navbar>
</ion-header>

<ion-content padding no-bounce>
  <div #fixedContainer ion-fixed>
    <ion-row>
      <ion-col *ngFor="let color of colors" [style.background]="color" class="color-block" tappable (click)="selectColor(color)"></ion-col>
    </ion-row>

    <ion-row radio-group [(ngModel)]="selectedColor">
      <ion-col *ngFor="let color of colors" text-center>
        <ion-radio [value]="color"></ion-radio>
      </ion-col>
    </ion-row>

    <canvas #imageCanvas (touchstart)="startDrawing($event)" (touchmove)="moved($event)"></canvas>

    <button ion-button full (click)="saveCanvasImage()">Save Image</button>
  </div>

  <ion-list *ngIf="storedImages.length > 0">
    <ion-list-header>Previous Drawings</ion-list-header>
    <ion-card *ngFor="let obj of storedImages; let i = index">
      <ion-card-content>
        <img [src]="getImagePath(obj.img)">
      </ion-card-content>
      <ion-row>
        <button ion-button full icon-only color="danger" (click)="removeImageAtIndex(i)">
          <ion-icon name="trash"></ion-icon>
        </button>
      </ion-row>
    </ion-card>
  </ion-list>

</ion-content>
Additional we add some CSS rules to make the view even better, but those are more or less optional so open your pages/home/home.scss and change it to:
page-home {
    canvas {
        display: block;
        border: 1px solid rgb(187, 178, 178);
    }
    .color-block {
        height: 40px;
    }
}
This won’t work by now as we haven added all the variables and functions so let’s do this now.
Painting On Our Canvas Like Picasso
There’s quite a bit of code needed for the logic and therefore I’ll split up the different parts in this section.
We start with the basic variables we gonna need plus the initial logic to make our div sticky at the top. I also added the link to an open Github issue on this topic where I got the code from to fix this current problem.
Once the app is loaded we try to load all of our stored images. This will be an empty array when we first start the app, but of course later we will get the actual stored images (more precisely: the names!).
Inside the ionViewDidLoad we also update our canvas element and set the appropriate size, and that’s all for the starting phase.
Open your pages/home/home.ts and change it to:
import { Component, ViewChild, Renderer } from '@angular/core';
import { NavController, Platform, normalizeURL, Content } from 'ionic-angular';
import { File, IWriteOptions } from '@ionic-native/file';
import { Storage } from '@ionic/storage';

const STORAGE_KEY = 'IMAGE_LIST';

@Component({
  selector: 'page-home',
  templateUrl: 'home.html'
})
export class HomePage {
  // Canvas stuff
  @ViewChild('imageCanvas') canvas: any;
  canvasElement: any;

  saveX: number;
  saveY: number;

  storedImages = [];

  // Make Canvas sticky at the top stuff
  @ViewChild(Content) content: Content;
  @ViewChild('fixedContainer') fixedContainer: any;

  // Color Stuff
  selectedColor = '#9e2956';

  colors = [ '#9e2956', '#c2281d', '#de722f', '#edbf4c', '#5db37e', '#459cde', '#4250ad', '#802fa3' ];

  constructor(public navCtrl: NavController, private file: File, private storage: Storage, public renderer: Renderer, private plt: Platform) {
    // Load all stored images when the app is ready
    this.storage.ready().then(() => {
      this.storage.get(STORAGE_KEY).then(data => {
        if (data != undefined) {
          this.storedImages = data;
        }
      });
    });
  }

  ionViewDidEnter() {
    // https://github.com/ionic-team/ionic/issues/9071#issuecomment-362920591
    // Get the height of the fixed item
    let itemHeight = this.fixedContainer.nativeElement.offsetHeight;
    let scroll = this.content.getScrollElement();

    // Add preexisting scroll margin to fixed container size
    itemHeight = Number.parseFloat(scroll.style.marginTop.replace("px", "")) + itemHeight;
    scroll.style.marginTop = itemHeight + 'px';
  }

  ionViewDidLoad() {
    // Set the Canvas Element and its size
    this.canvasElement = this.canvas.nativeElement;
    this.canvasElement.width = this.plt.width() + '';
    this.canvasElement.height = 200;
  }

}
Now we got the basics and can start the actual drawing part of the app. We already added the functions to the view so we now need to handle both the touchstart and touchmove events.
For the first, we simply store the current position of the touch. Also, as our canvas lives somewhere on the screen we need to calculate the offset from the actual screen using getBoundingClientRect. The result is the real position for both the x and y value!
To draw a line we can use both the starting value of our touch and the new value (calculated to with the offset). We then get our drawing context from the canvas and define how lines should look, which color they have and which width they have.
We then execute the stroke onto our canvas creating a line between two points! Actually it’s as simple as that.
These 2 functions now allow us to draw with different selected colours onto our canvas image, but we want to go one step further. Inside our saveCanvasImage function we need to transform the canvas element first of all to a base64 string using toDataURL.
I had problems storing this string directly, therefore we transform the data into a Blob using the function b64toBlob. This Blob object is now perfect to be stored, so we use the File plugin to write the file into our apps data directory.
Now add these functions below the previous code inside pages/home/home.ts and of course inside the class:
selectColor(color) {
  this.selectedColor = color;
}

startDrawing(ev) {
  var canvasPosition = this.canvasElement.getBoundingClientRect();

  this.saveX = ev.touches[0].pageX - canvasPosition.x;
  this.saveY = ev.touches[0].pageY - canvasPosition.y;
}

moved(ev) {
  var canvasPosition = this.canvasElement.getBoundingClientRect();

  let ctx = this.canvasElement.getContext('2d');
  let currentX = ev.touches[0].pageX - canvasPosition.x;
  let currentY = ev.touches[0].pageY - canvasPosition.y;

  ctx.lineJoin = 'round';
  ctx.strokeStyle = this.selectedColor;
  ctx.lineWidth = 5;

  ctx.beginPath();
  ctx.moveTo(this.saveX, this.saveY);
  ctx.lineTo(currentX, currentY);
  ctx.closePath();

  ctx.stroke();

  this.saveX = currentX;
  this.saveY = currentY;
}


saveCanvasImage() {
  var dataUrl = this.canvasElement.toDataURL();

  let ctx = this.canvasElement.getContext('2d');
  ctx.clearRect(0, 0, ctx.canvas.width, ctx.canvas.height); // Clears the canvas

  let name = new Date().getTime() + '.webp';
  let path = this.file.dataDirectory;
  let options: IWriteOptions = { replace: true };

  var data = dataUrl.split(',')[1];
  let blob = this.b64toBlob(data, 'image.webp');

  this.file.writeFile(path, name, blob, options).then(res => {
    this.storeImage(name);
  }, err => {
    console.log('error: ', err);
  });
}

// https://forum.ionicframework.com/t/save-base64-encoded-image-to-specific-filepath/96180/3
b64toBlob(b64Data, contentType) {
  contentType = contentType || '';
  var sliceSize = 512;
  var byteCharacters = atob(b64Data);
  var byteArrays = [];

  for (var offset = 0; offset < byteCharacters.length; offset += sliceSize) {
    var slice = byteCharacters.slice(offset, offset + sliceSize);

    var byteNumbers = new Array(slice.length);
    for (var i = 0; i < slice.length; i++) {
      byteNumbers[i] = slice.charCodeAt(i);
    }

    var byteArray = new Uint8Array(byteNumbers);

    byteArrays.push(byteArray);
  }

  var blob = new Blob(byteArrays, { type: contentType });
  return blob;
}
So this will create the actual file but we still need to keep track of the files we created.
Saving Our Canvas Images
That’s why we use the Ionic storage to store the information of an image which is in this case only the name. It’s important to not store the full path to the file because segments of that URL might change and you won’t be able to find your file later on. Simple store the name and you will always find the files using file.dataDirectory later on!
When we add a new image we also scroll our list to the bottom, a nice little effect to make the app more visual appealing.
To remove an image we now only need the actual image information to remove it from the storage and also to delete the file at the given path.
Finally, the last function takes care of resolving all file URLs when you restart the app. As we only store the names of the images we need to create the correct path to the image using the file plugin.
Additional we use the normalizeURL function of Ionic to prevent any issues with the WKWebView on iOS!
Finish your code by adding the last missing functions below the previous ones inside pages/home/home.ts:
storeImage(imageName) {
  let saveObj = { img: imageName };
  this.storedImages.push(saveObj);
  this.storage.set(STORAGE_KEY, this.storedImages).then(() => {
    setTimeout(() =>  {
      this.content.scrollToBottom();
    }, 500);
  });
}

removeImageAtIndex(index) {
  let removed = this.storedImages.splice(index, 1);
  this.file.removeFile(this.file.dataDirectory, removed[0].img).then(res => {
  }, err => {
    console.log('remove err; ' ,err);
  });
  this.storage.set(STORAGE_KEY, this.storedImages);
}

getImagePath(imageName) {
  let path = this.file.dataDirectory + imageName;
  // https://ionicframework.com/docs/wkwebview/#my-local-resources-do-not-load
  path = normalizeURL(path);
  return path;
}
Conclusion
It’s actually not super hard to build your own drawing app, and working with the file system has gotten so much easier since earlier versions.
Although there’s some code involved in here, nothing of this is really fancy stuff but of course if you have any problems or issues feel free to leave a comment!
You can also find a video version of this article below.
