Capture and Store Videos with an Auto-generated Thumbnail in your Ionic App Last update: 2014-12-30
Recording videos from your app can be a substantial part, and with Ionic and ngCordova it’s no problem at all! In this tutorial I will show you how to record videos through a video service, and use the returned video data to save the material inside your application folder. On this way, you can be sure the videos will exist even when the user deletes them from his library, which could otherwise lead to hard crashes.
Setup your base app
We start with a blank app and install ngCordova via bower, then we add a platform to test the functions. ngCordova or Cordova can’t be used in the browser with ‘ionic serve’, so make sure to add a platform!
ionic start devdactic-videocapture blank
cd devdactic-videocapture
bower install --save ngCordova
ionic platform add ios
ionic prepare ios
ionic build ios
This tutorial uses ngCordova 0.1.9-alpha and Ionic 1.0.0-beta.14
Additional, we need a controller and a service, so create services.js and controllers.js next to your app.js and include them both in your index.html:
<script src="js/controllers.js"></script>
<script src="js/services.js"></script>
To make use of ngCordova, we need to include this in our index.html BEFORE the cordova.js!
<script src="lib/ngCordova/dist/ng-cordova.js"></script>Also our app.js should load controllers and services, so add it after the standard ionic module:
angular.module('starter', ['ionic', 'starter.controllers', 'starter.services'])Now open the services.js and add the beginning of our service:
angular.module('starter.services', [])

.service('VideoService', function($q) {
    // TBD
});
And finally open the controllers.js to add the ngCordova module and inject our VideoService:
angular.module('starter.controllers', ['ngCordova'])

.controller('VideoCtrl', function($scope, $cordovaCapture, VideoService) {
    // TBD
});
That’s it for the base of our video-recording app, now we can add the real functionality.
For a guide on how to take images, check out my guide to capture and store images
Adding the video capture functions
First of all, we need to show a button to start recording a video, and also an area to display the last recorded video. Therefore, open your index.html and replace everything inside the body with:
<ion-view ng-controller="VideoCtrl">
	<ion-header-bar class="bar-stable">
		<h1 class="title">My videos</h1>
	</ion-header-bar>
	<ion-content>
		<div class="list">
			<div class="item item-divider">
				<i class="ion-videocamera"></i>
				Current clip
			</div>
			<img
				ng-src="{{urlForClipThumb(clip)}}"
				ng-click="showClip(clip)"
				style="height: 250px; width: 150px;"
			/>
		</div>
	</ion-content>
	<ion-footer-bar align-title="center" class="bar bar-light">
		<div class="button-bar">
			<button class="button button-positive" ng-click="captureVideo()">Capture a video</button>
		</div>
	</ion-footer-bar>
</ion-view>
A bit of code, but actually we added just these things:
- A tiny header bar
- A list with one item(well..whatever)
- The preview image which is set through ng-src and a ng-click event
- The button in the footer to start recording a video
If we run our app now, it should look like this:
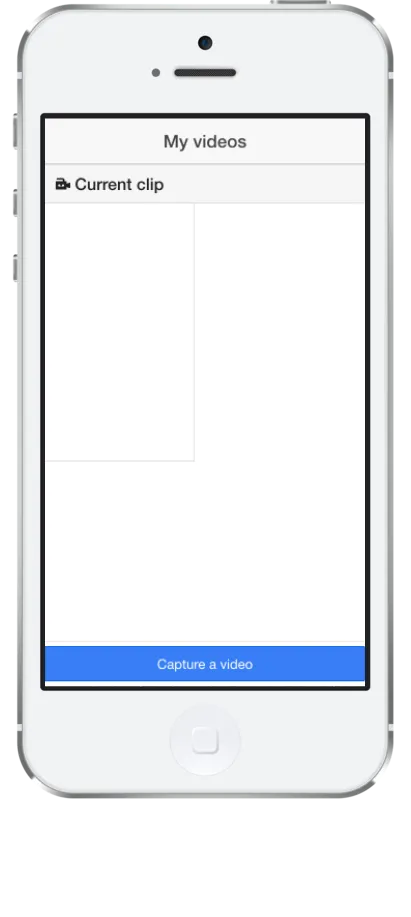 Obviously nothing works right now, so open the controllers.js to add some functions:
$scope.clip = '';

$scope.captureVideo = function() {
	$cordovaCapture.captureVideo().then(function(videoData) {
		VideoService.saveVideo(videoData).success(function(data) {
			$scope.clip = data;
			$scope.$apply();
		}).error(function(data) {
			console.log('ERROR: ' + data);
		});
	});
};
First we define our scope video, which will always be the last one recorded. The captureVide function is assigned to our footer button and calls the cordovaCapture wrapper, which will open a record dialog for the user. If the user successful records a video and proceeds, we get the data in the promise as videoData. From that point on, we will give the work to our VideoService which should take care of everything, and if the process of storing the video local was successful, we update our scope variable. No magic by now! Let’s head over to the services.js and add a bit of code:
var deferred = $q.defer();
var promise = deferred.promise;

promise.success = function(fn) {
	promise.then(fn);
	return promise;
}
promise.error = function(fn) {
	promise.then(null, fn);
	return promise;
}
This part will help us later on to return a promise and use the stored data when its ready. You might have seen this pattern in my simple login example, now it is really helpful as we want to update our view first when the movie is copied to our local app directory.
As the next functions all call each other, I will post the complete code. The documentation will be above the functions, so just see whats happening here.
// Resolve the URL to the local file
// Start the copy process
function createFileEntry(fileURI) {
	window.resolveLocalFileSystemURL(fileURI, function(entry) {
		return copyFile(entry);
	}, fail);
}

// Create a unique name for the videofile
// Copy the recorded video to the app dir
function copyFile(fileEntry) {
	var name = fileEntry.fullPath.substr(fileEntry.fullPath.lastIndexOf('/') + 1);
	var newName = makeid() + name;

	window.resolveLocalFileSystemURL(cordova.file.dataDirectory, function(fileSystem2) {
			fileEntry.copyTo(fileSystem2, newName, function(succ) {
				return onCopySuccess(succ);
			}, fail);
		},
		fail
	);
}

// Called on successful copy process
// Creates a thumbnail from the movie
// The name is the moviename but with .webp instead of .mov
function onCopySuccess(entry) {
	var name = entry.nativeURL.slice(0, -4);
	window.PKVideoThumbnail.createThumbnail (entry.nativeURL, name + '.webp', function(prevSucc) {
		return prevImageSuccess(prevSucc);
	}, fail);
}

// Called on thumbnail creation success
// Generates the currect URL to the local moviefile
// Finally resolves the promies and returns the name
function prevImageSuccess(succ) {
	var correctUrl = succ.slice(0, -4);
	correctUrl += '.MOV';
	deferred.resolve(correctUrl);
}

// Called when anything fails
// Rejects the promise with an Error
function fail(error) {
	console.log('FAIL: ' + error.code);
	deferred.reject('ERROR');
}

// Function to make a unique filename
function makeid() {
	var text = '';
	var possible = 'ABCDEFGHIJKLMNOPQRSTUVWXYZabcdefghijklmnopqrstuvwxyz0123456789';
	for ( var i=0; i < 5; i++ ) {
		text += possible.charAt(Math.floor(Math.random() * possible.length));
	}
	return text;
}

// The object and functions returned from the Service
return {
	// This is the initial function we call from our controller
	// Gets the videoData and calls the first service function
	// with the local URL of the video and returns the promise
	saveVideo: function(data) {
		createFileEntry(data[0].localURL);
		return promise;
	}
}
Most of this is straight forward, but one part is a bit new: We create a Thumbnail of our just recorded video on the fly! How? With the help of a simple cordova plugin. To use the plugin, we need to add it:
cordova plugin add com.photokandy.videothumbnailAfter adding the plugin you might need to remove the platform and add/build it new, as this somehow works not correct on my side.
All in all, we are copying the recorded movie file to our app directory, rename it, create a thumbnail from the movie and return the name of the video with our promise. Everything clean in a service, that’s AngularJS in action. If you think theres a better way to do all this, please leave me a comment!
To finally display the thumbnail we only need to add the missing functions, as we have already defined the source for the image in our index, so open our controllers.js and add:
$scope.urlForClipThumb = function(clipUrl) {
	var name = clipUrl.substr(clipUrl.lastIndexOf('/') + 1);
	var trueOrigin = cordova.file.dataDirectory + name;
	var sliced = trueOrigin.slice(0, -4);
	return sliced + '.webp';
}

$scope.showClip = function(clip) {
	console.log('show clip: ' + clip);
}
The first function returns the correct path to the image. We just cut out the ‘.mov’ from the URL and replace it with ‘.webp’, so the image gets correctly displayed. The second one is assigned to the ng-click event of the image(movie), as we might want to perform some action when the user clicks on a preview image of a clip.
Now run your app, capture a video and the result should look like this (the preview might be different): 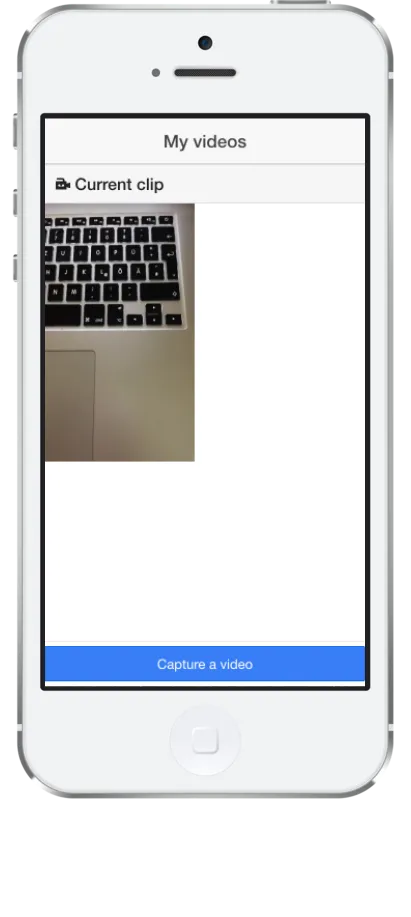
If you want to experiment with the local movie file, you could try to send it as an email attachment!
Conclusion
This tutorial showed how it’s possible to capture a video, create a thumbnail and display everything properly with Ionic and the help of AngularJS and ngCordova / Cordova plugins. From this point, you could create a action to present the recorded video to the user if he wants to see it again. If you would like to see a solution for this, just leave me a comment and I will try to come up with a tutorial soon!
If this tutorial was helpful, follow me on twitter @schlimmson and leave a comment/ tweet it! Don’t forget to subscribe to my newsletter to receive new posts and infos via mail!
So long, Saimon